• Home
  • Meet Rosalynn
    • About
    • Portfolio
    • Contact
  • Facebook
  • Instagram
  • Pinterest
  • Twitter
  • YouTube

Rosalynn Daniels

Recipes, DIY, Motherhood, Entertainment

You are here: Home / Uncategorized / How to cook a rack of lamb in the oven or the grill

How to cook a rack of lamb in the oven or the grill

March 16, 2021 easter, Easy Meals, Entertainment, Food + Recipes, Holiday, lamb, One Skillet, Uncategorized

Did you purchase an expensive rack of lamb and you’re afraid of destroying it by cooking it incorrectly? Well don’t fret, you have reached the right place. In this post, I will teach you how to cook a flavorful and tender rack of lamb in the oven or on the grill with a very simple cooking technique. It truly is an easy method and literally takes no time to do. I have also provided my recipe for my simple mint and garlic sauce that you can use on your lamb in lieu of mint jelly.

How to cook a rack of lamb in the oven or the grill

This delicious recipe is brought to you in partnership with Zwilling. This post also includes affiliate links that allow me to receive commission for your purchases at no additional cost to you. Thank you for supporting the brands that support RosalynnDaniels.com.


What is a Rack of Lamb and how should you purchase it?

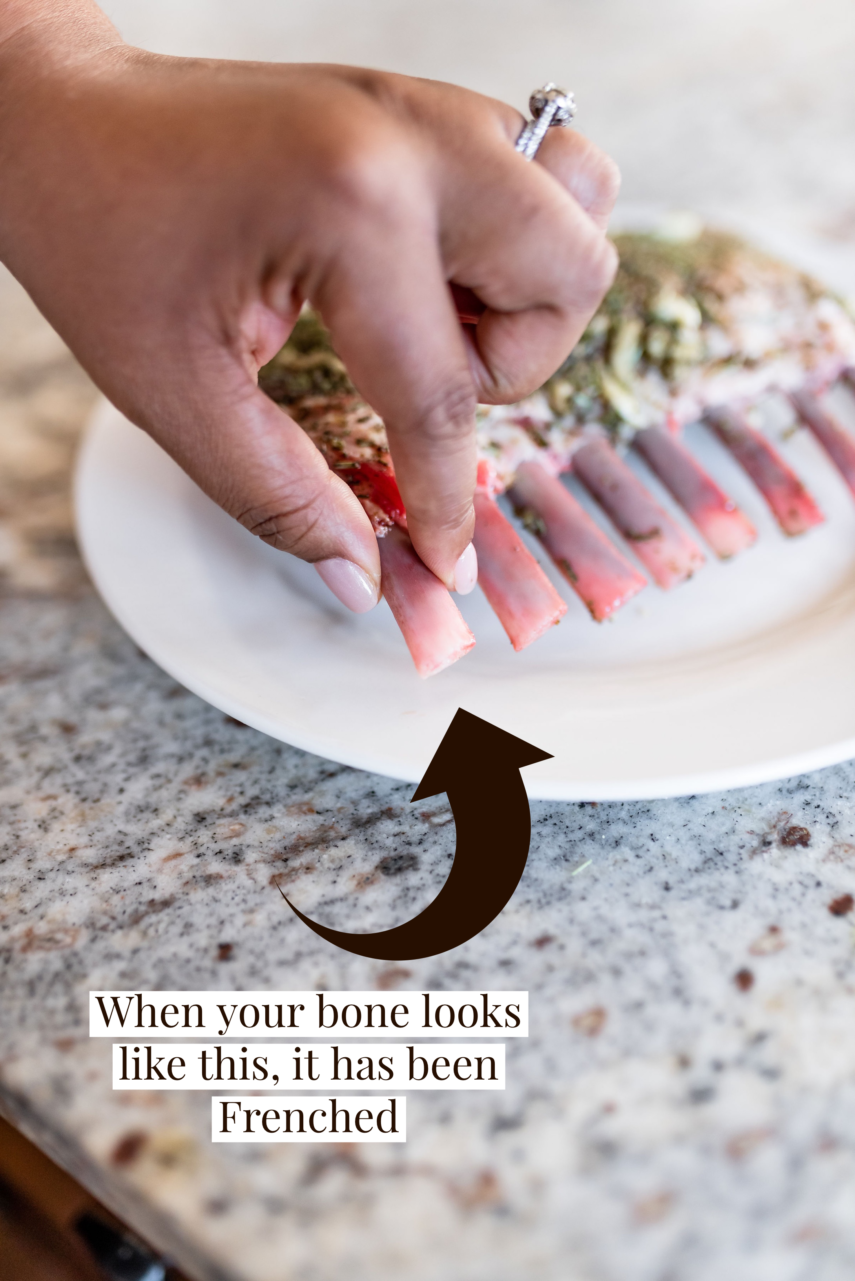
A rack of lamb refers to the rib cut of meat from a lamb. It usually comes with 8 to 9 ribs on the rack. When you purchase your rack, you want to make sure that your butcher has already “Frenched” the bone so that you don’t have to do it. Frenching the bones, refer to cutting off the excess meat at the end of the bone so that you can easily grab each rib. Frenching your lamb also elevates it’s appearance and gives you more of a restaurant vibe.

How to cook a rack of lamb in the oven or the grill

A few things to keep in mind when it’s time when purchasing a rack of lamb:

  • It is hard to find a rack of lamb when it’s not around holiday time. While you may be able to find it throughout the year at some places, I have found that I usually can purchase a rack at Whole Foods and they are usually already frenched.
  • Try to find a rack with larger bones. The bones can easily burn when they are too thin, especially on the grill. Yes, you can cover them with foil to help prevent this, but you can also put the odds more in your favor by selecting a rack with larger bones.
  • When you slice into your rack, each rib is pretty small. In my family everyone eats about 3-4 ribs each, so I like to purchase two racks at a time.

What type of equipment do you need when cooking a rack of lamb in the oven or on the grill?

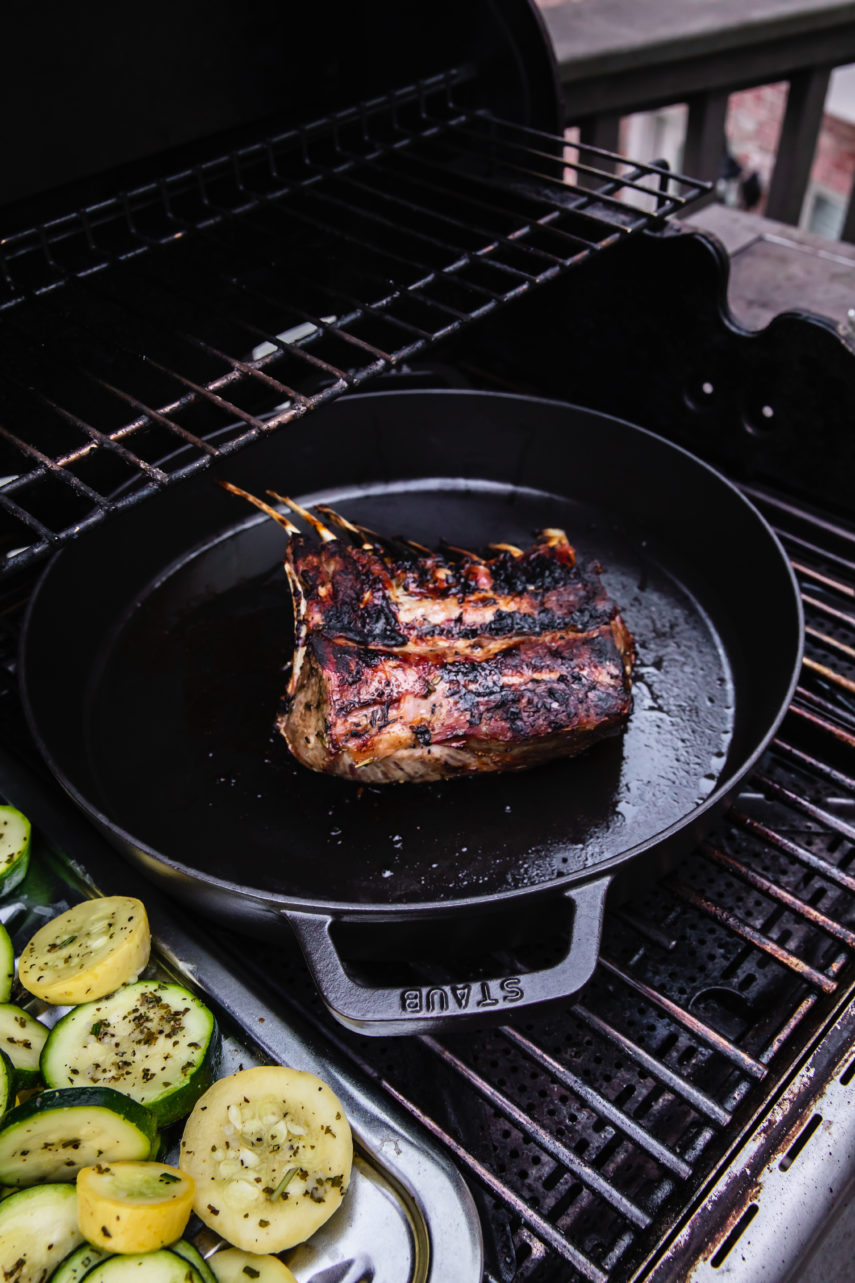
  • Pans: All you need is a large cast iron skillet when cooking your lamb. I love to use my Two Handle Staub Fry Pan (aka paella pan) when cooking my rack of lamb in both the oven and on the grill. It’s large enough to hold two racks of lamb and its two handles make it so easy to transfer from stove to oven.
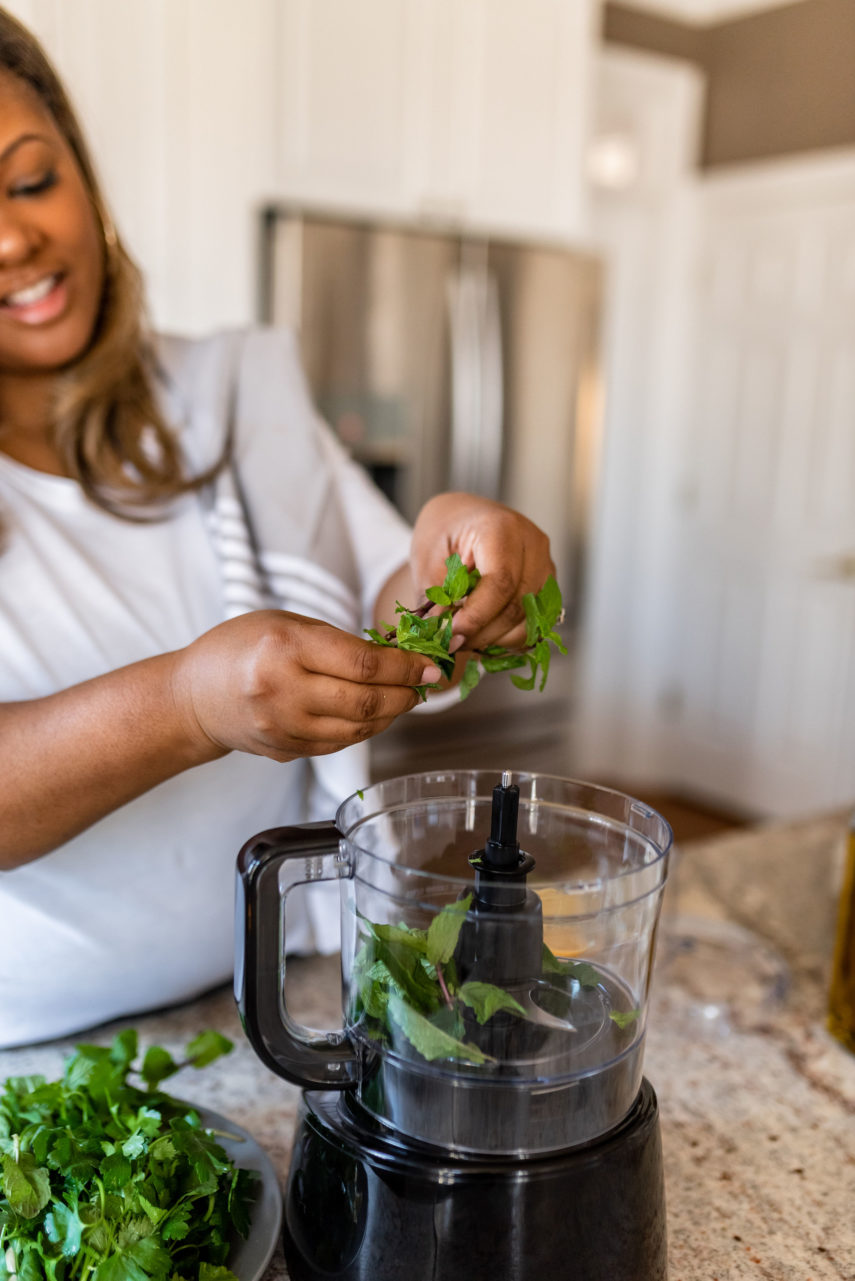
  • Food Processor: You will need a medium food processor to make your mint sauce. You can also use it to prepare your marinade.
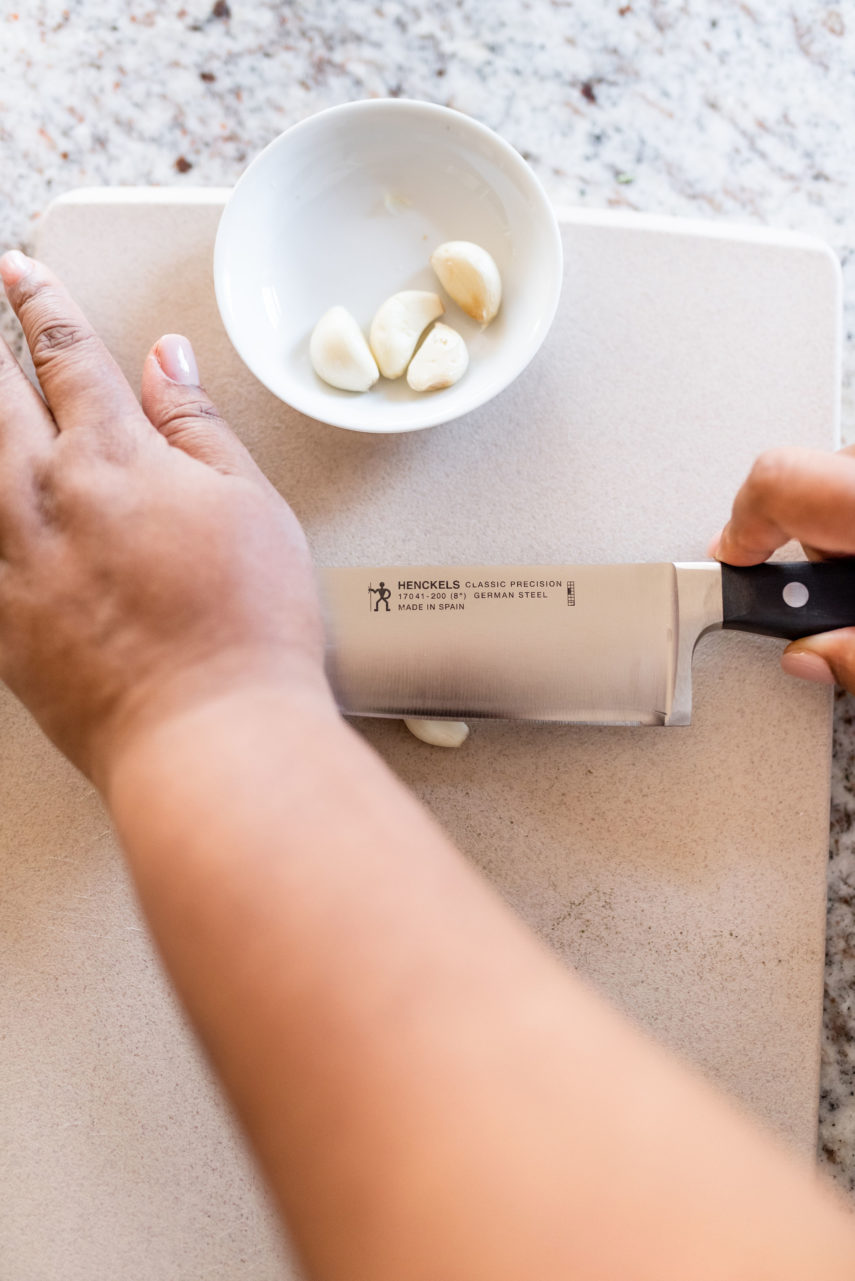
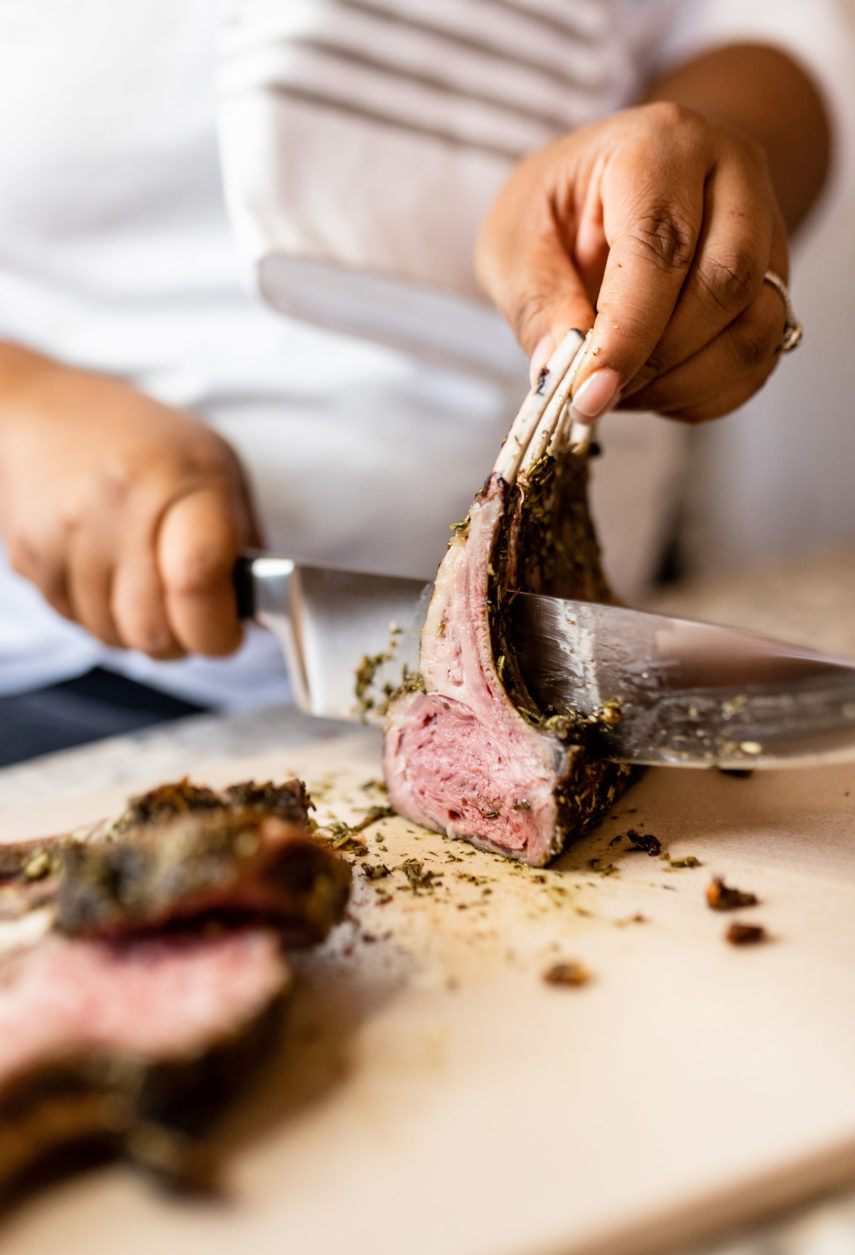
  • Chef’s Knife : I typically use my everyday Henckels Chef Knife to cut my garlic and herbs for this dish. I also love using it to easily slice through each rib. Using the proper knife to cut your meat allows the juices to stay in meat much more than cutting with a dull knife.

How to cook a rack of lamb in the oven or the grill

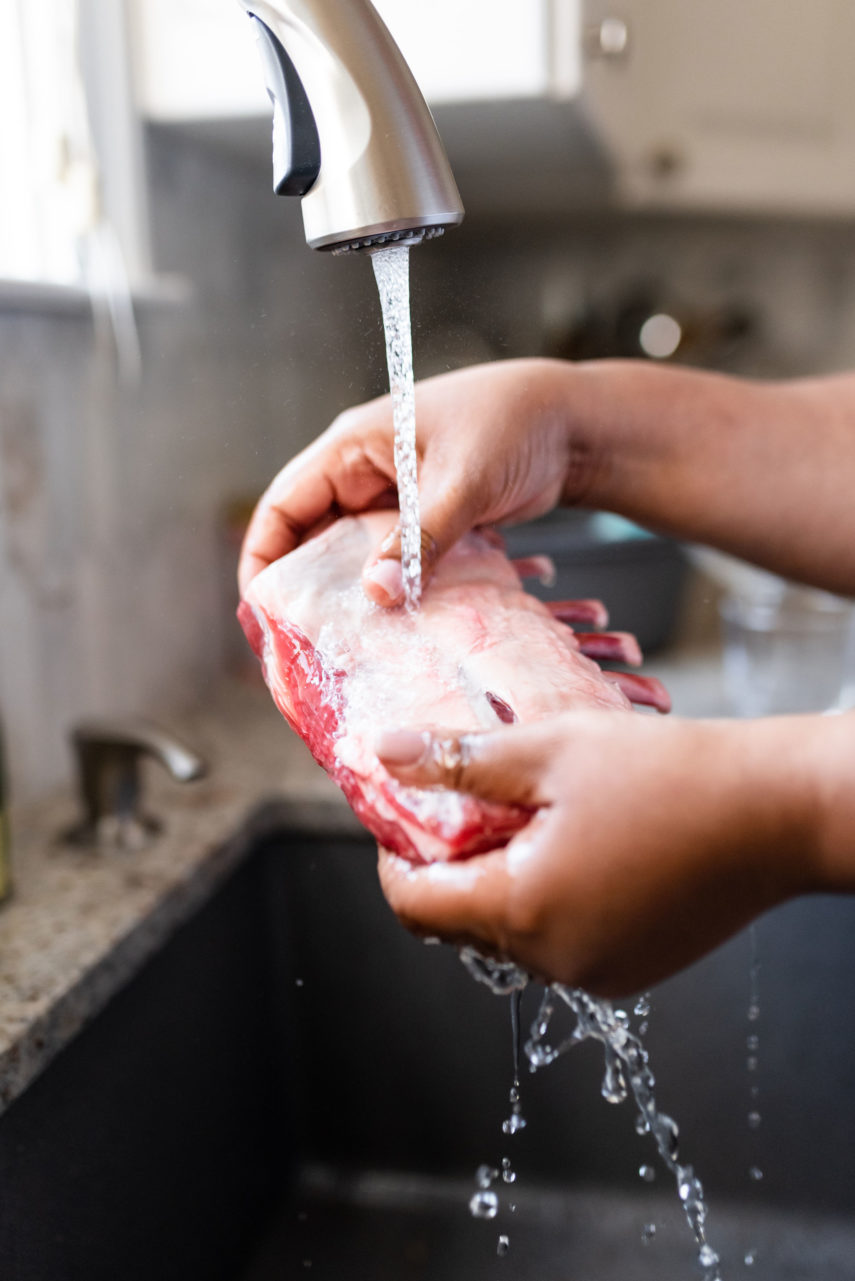
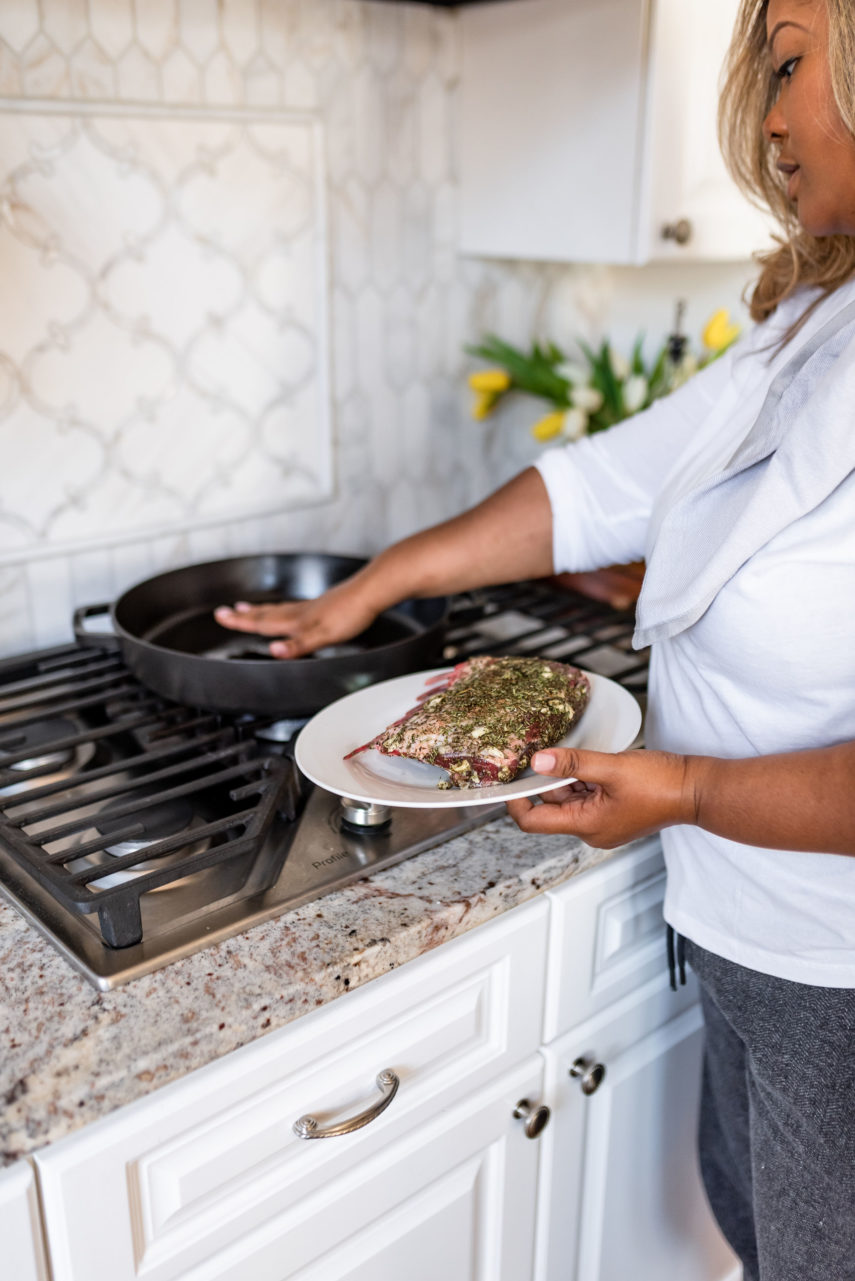
  • Step 1: Start by cleaning your rack of lamb. I like to clean my meat by wiping off access blood or grit from the bone under cold water. You can also do this by using white vinegar and water. After you clean your meat, pat off any excess water with a paper towel. Also remember to immediately disinfect your sink after cleaning off your meat.
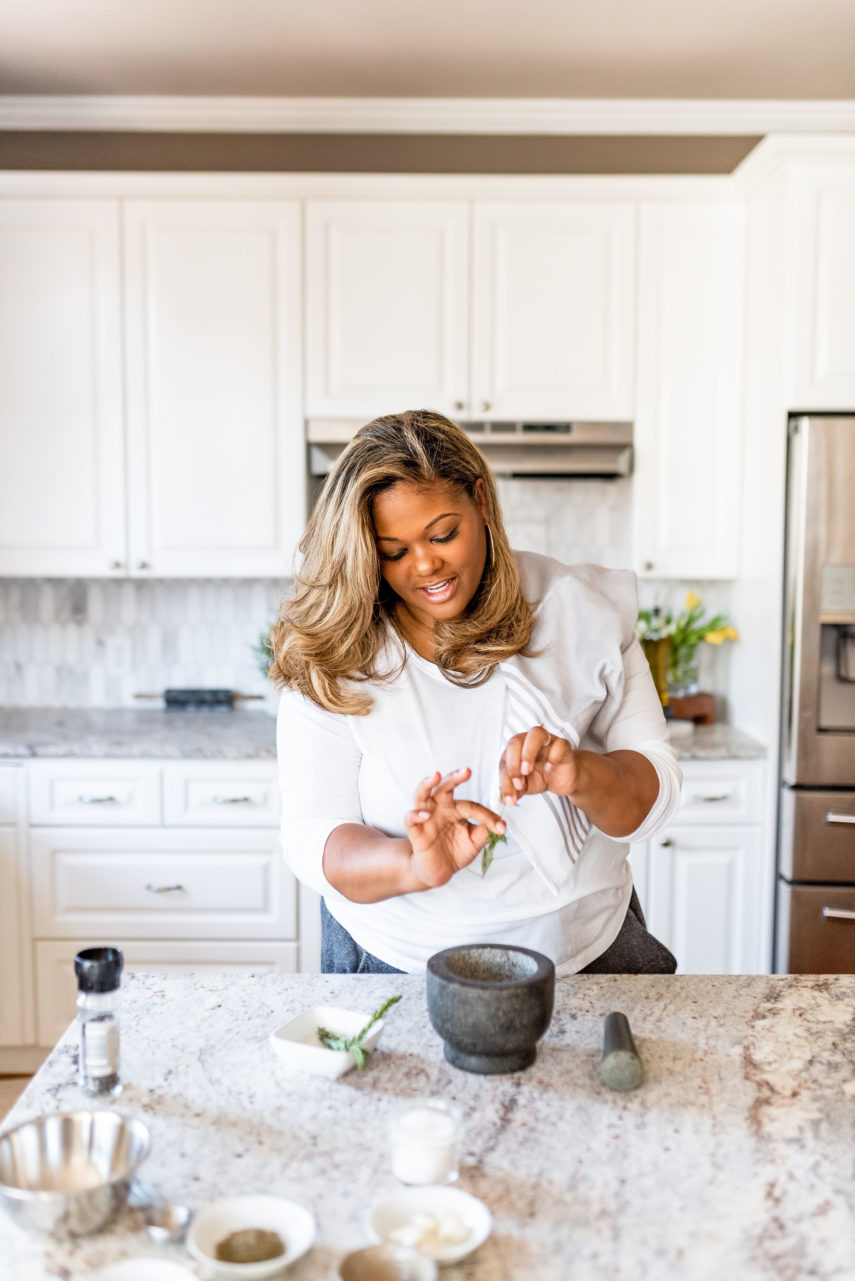
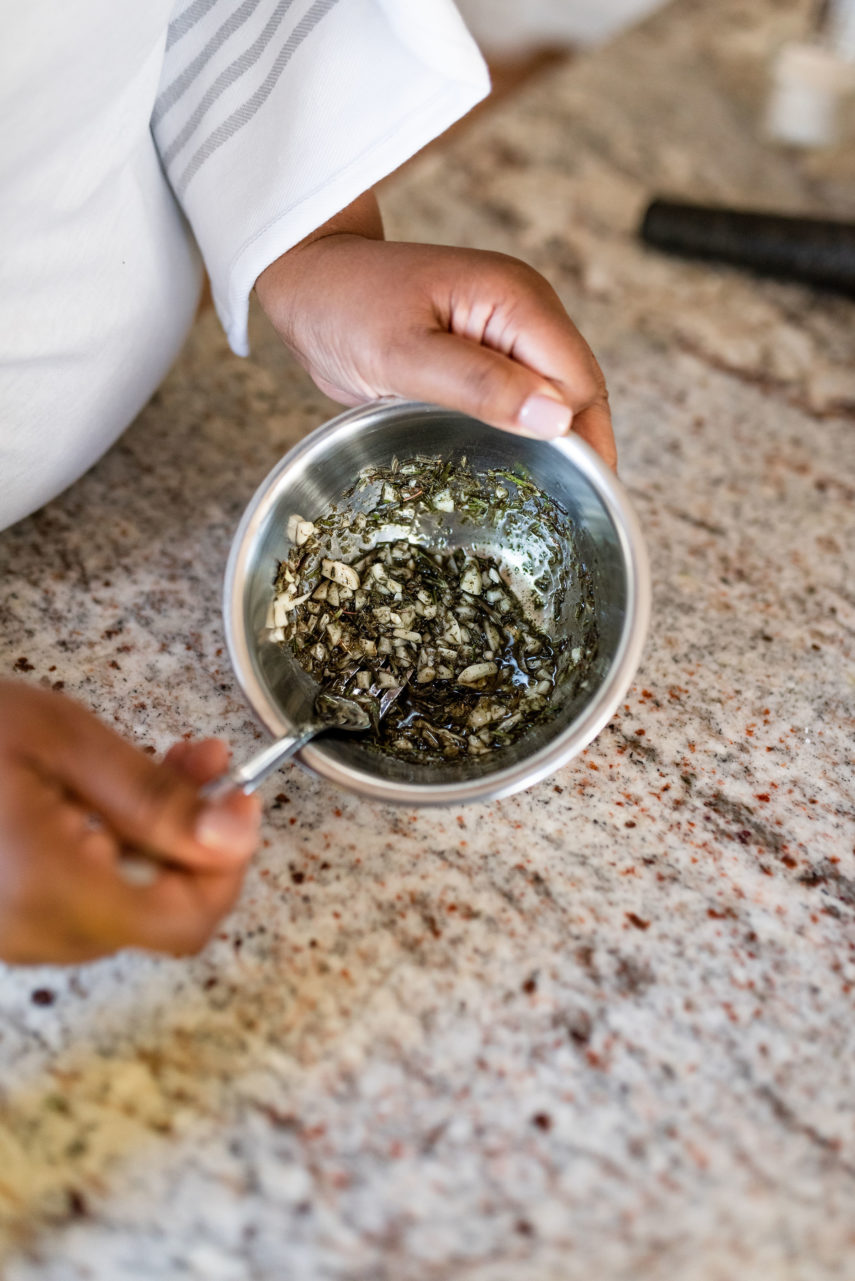
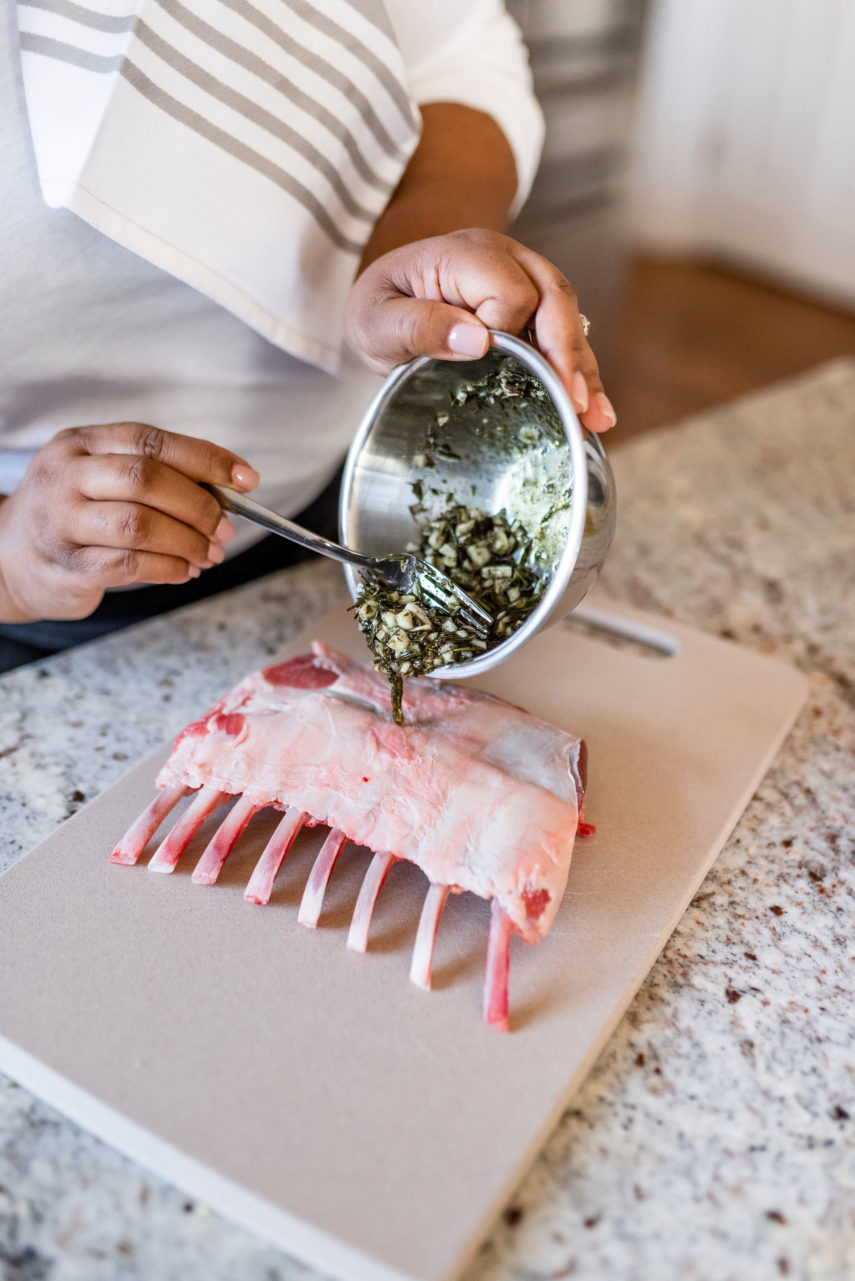
  • Step 2: Next you want to prepare your marinade. My marinade is simple and classic. You only need to use rosemary, garlic, olive oil, salt, and pepper. Yes, you can try so many different types of herbs and spices with your lamb, but the ingredients that I have listed are tried and true, they will not let you down. (Note that you can wait to put salt on your rack of lamb just before cooking to ensure that the salt doesn’t dry out your meat, however, I always add my salt to the marinade and have yet to dry out the meat. I prefer to add it to the marinade to get all of the flavor that I will need.)
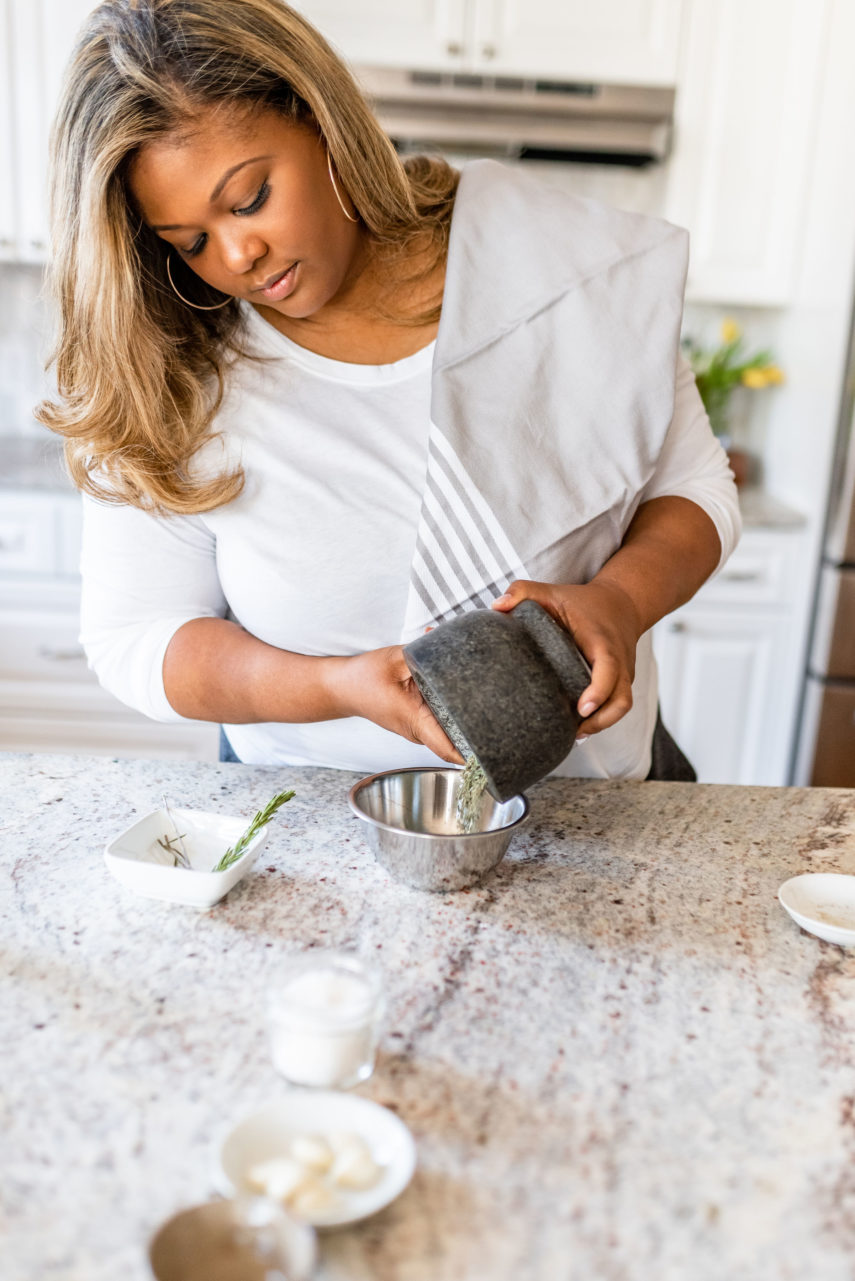
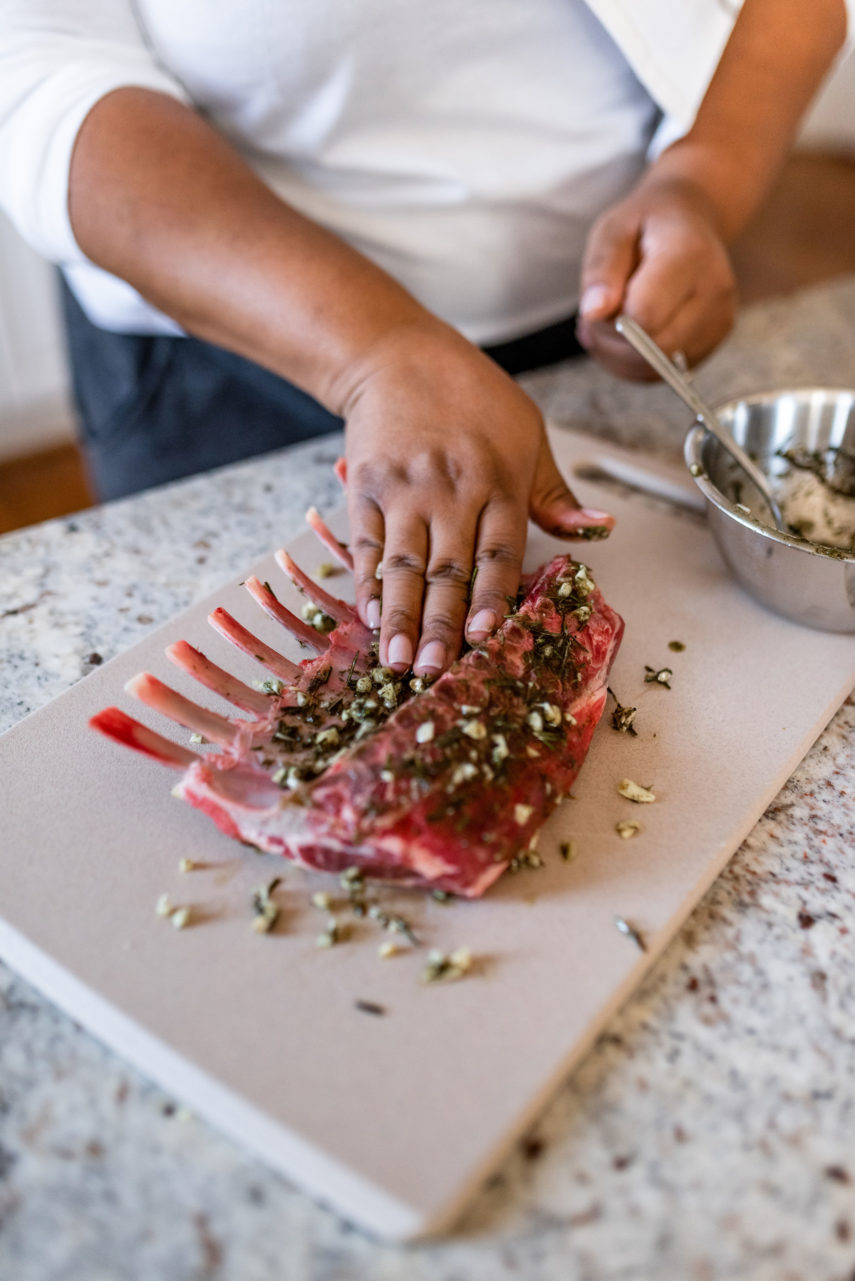
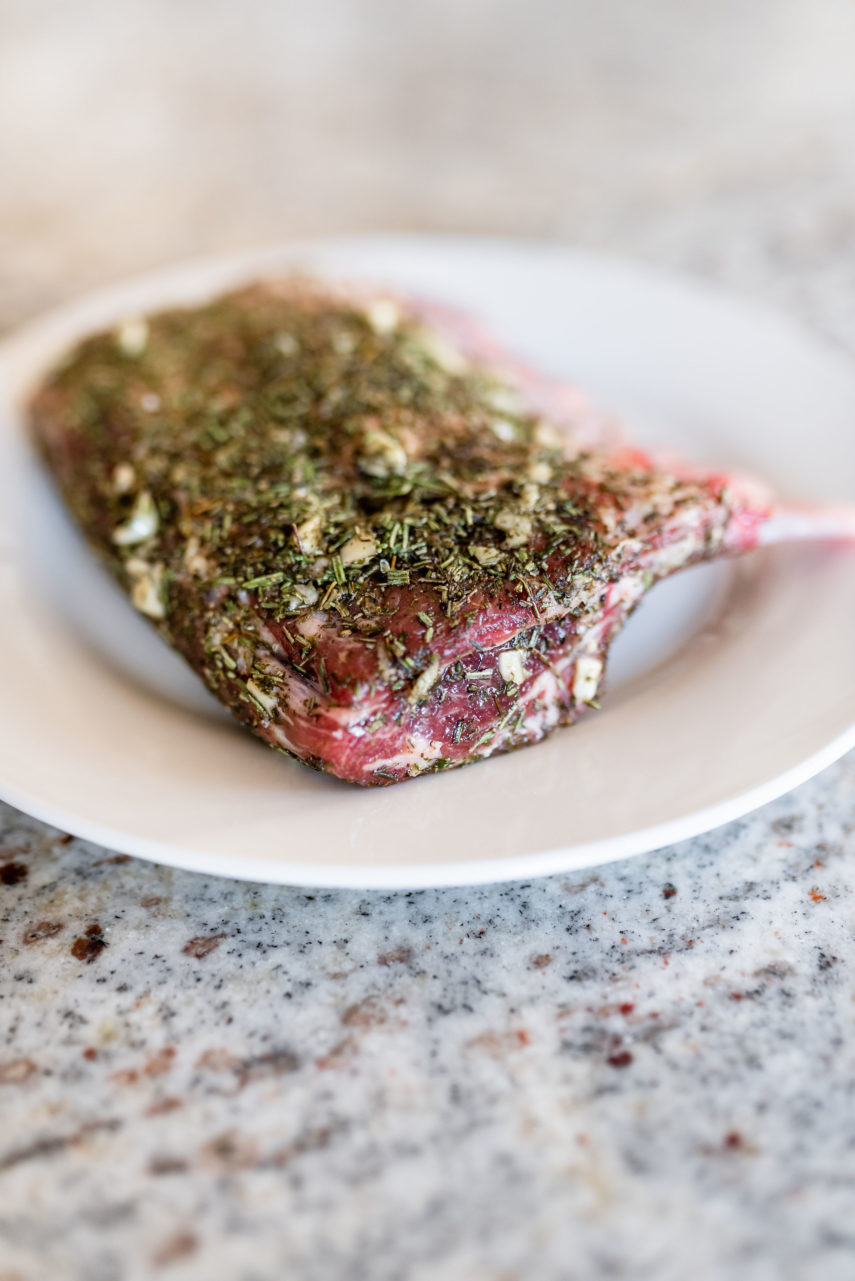
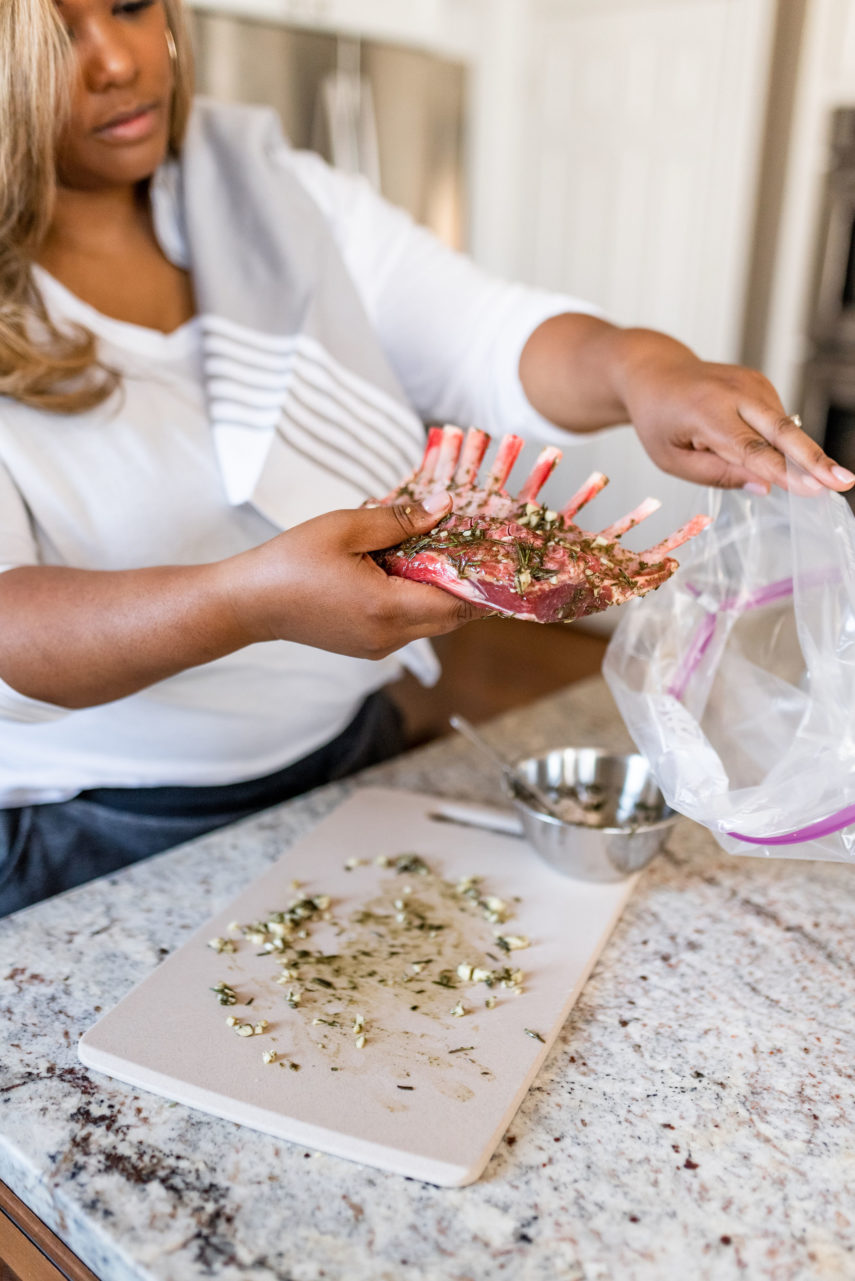
  • Step 3: Marinate your rack of lamb for at least 30 minutes if possible. In the best scenario, I like to marinate mine over night. Make sure that you rub in your marinade on both sides of the rack. Scoring the fat on your rack is not necessary, but it does not hurt. I place my racks of lamb in large storage bags, but if I’m going to marinate and then freeze for a later date, then I just use my Fresh and Save Vacuum Sealer.
  • Step 4: Prepare to cook. If you are cooking your rack of lamb on the stove or on the grill, you will essentially be doing the same steps just in different places.
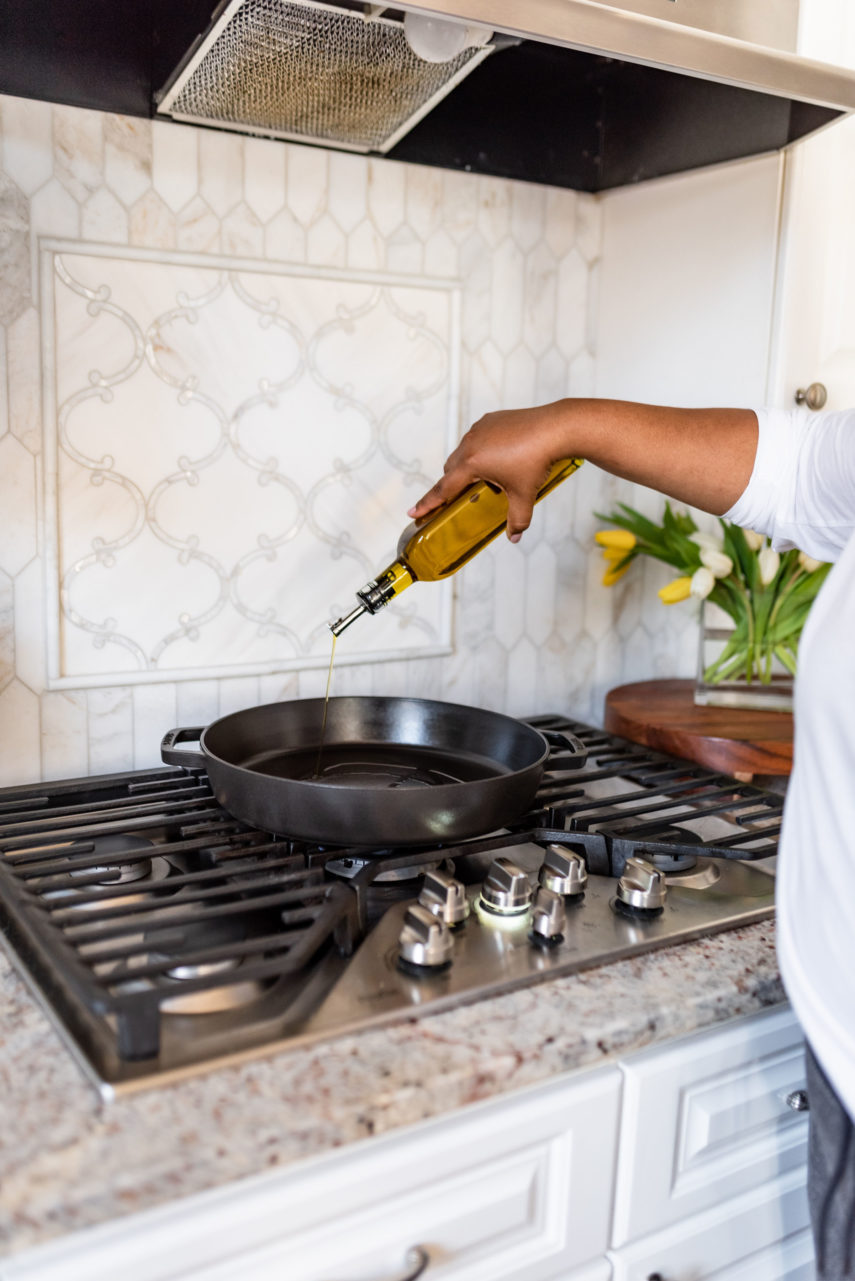
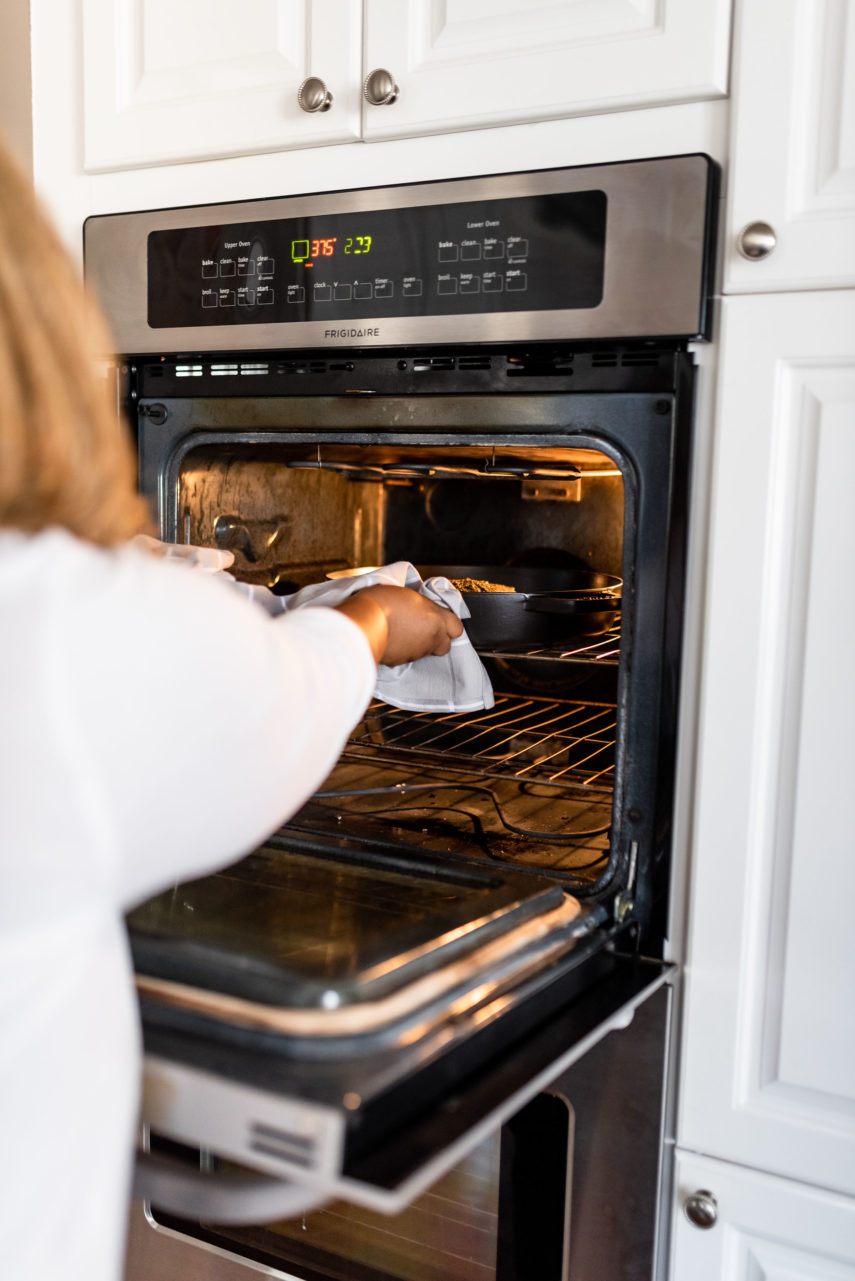
  1. Heat your skillet over medium high heat on the stove, or 400 degrees on your grill. You can use your favorite cooking oil, but I usually use grape seed oil or olive oil. If you are planning on cooking your lamb in the oven, then now is the time to pre-heat your oven to 375 degrees.
  2. If you have thin bones on your rack, you can cover them with foil to help prevent burning.
  3. Make sure your Staub Two Handle Skillet is nice and hot before placing your rack of lamb in it. You want to hear a sear when you lay down the meat.
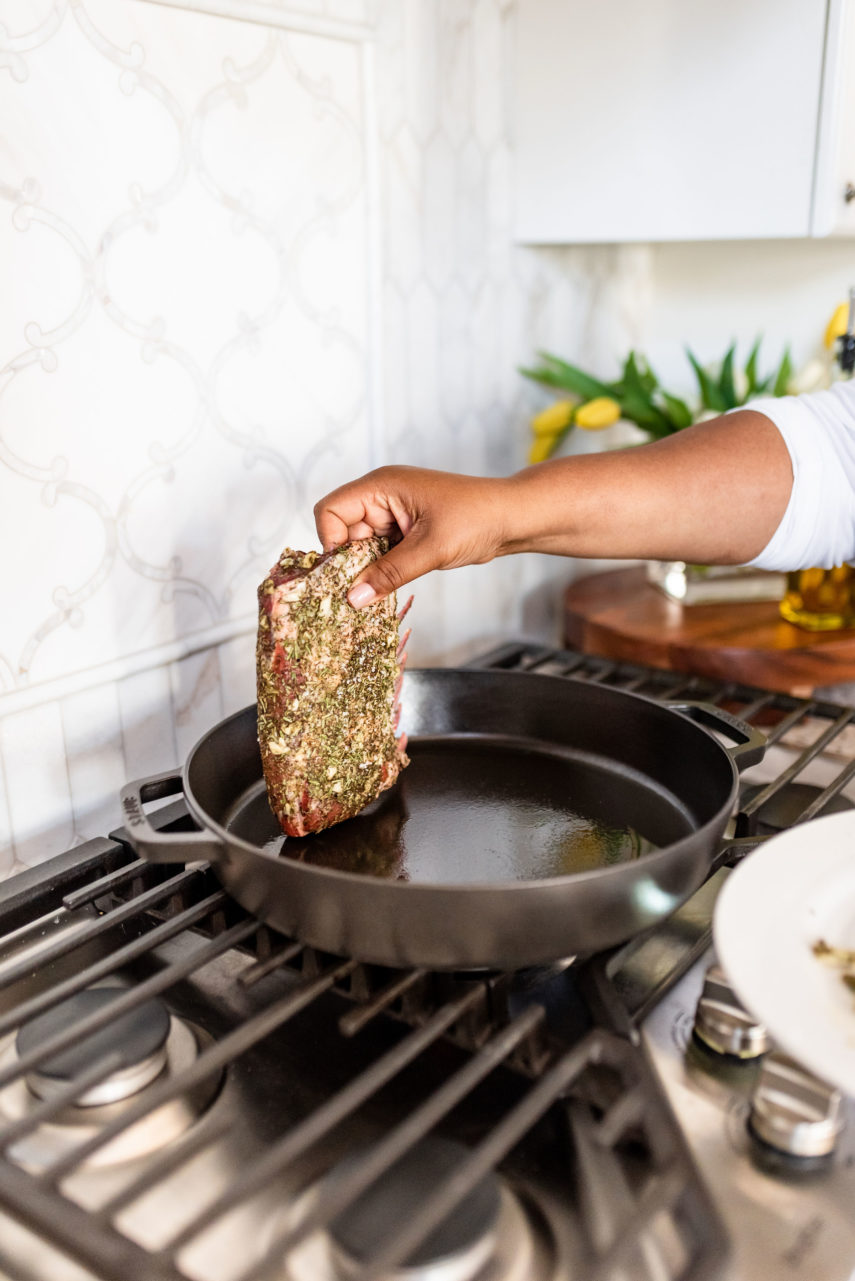
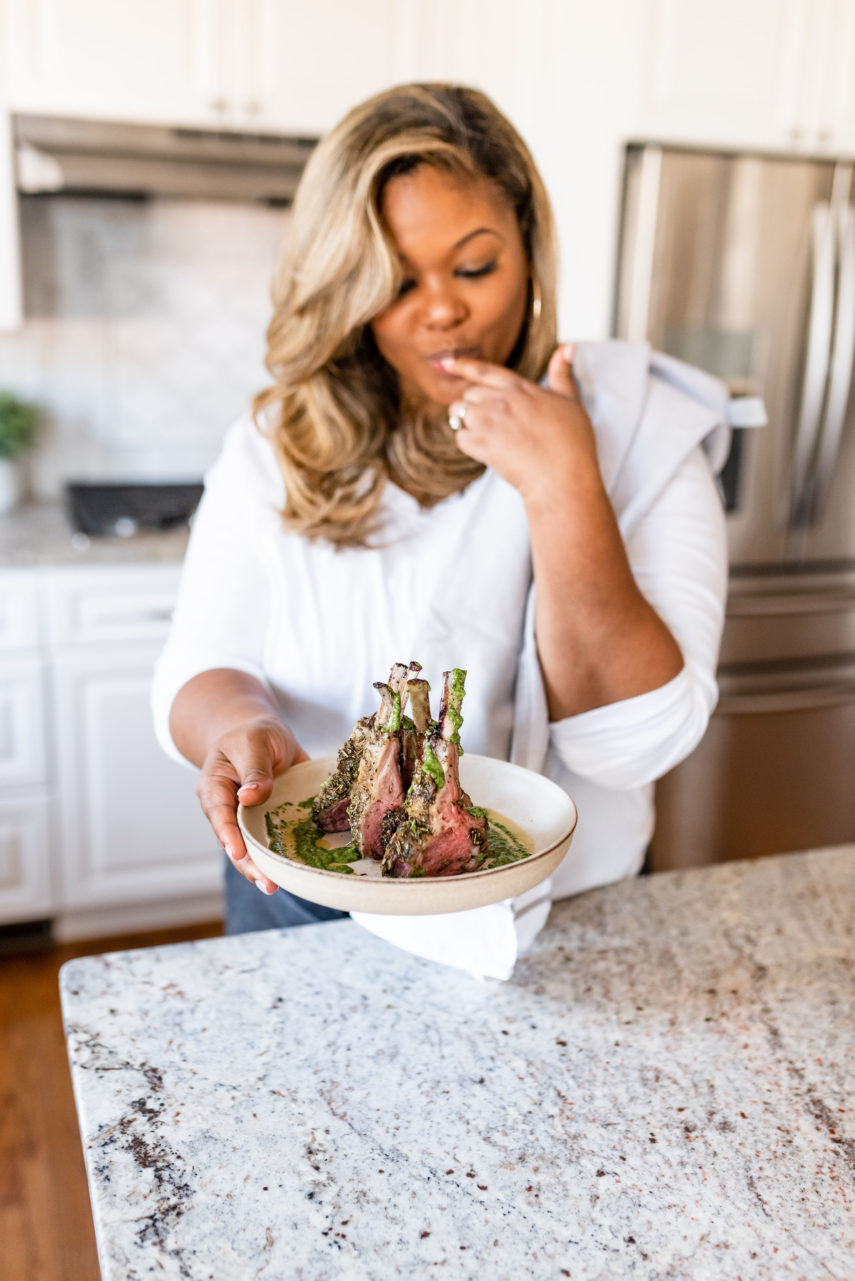
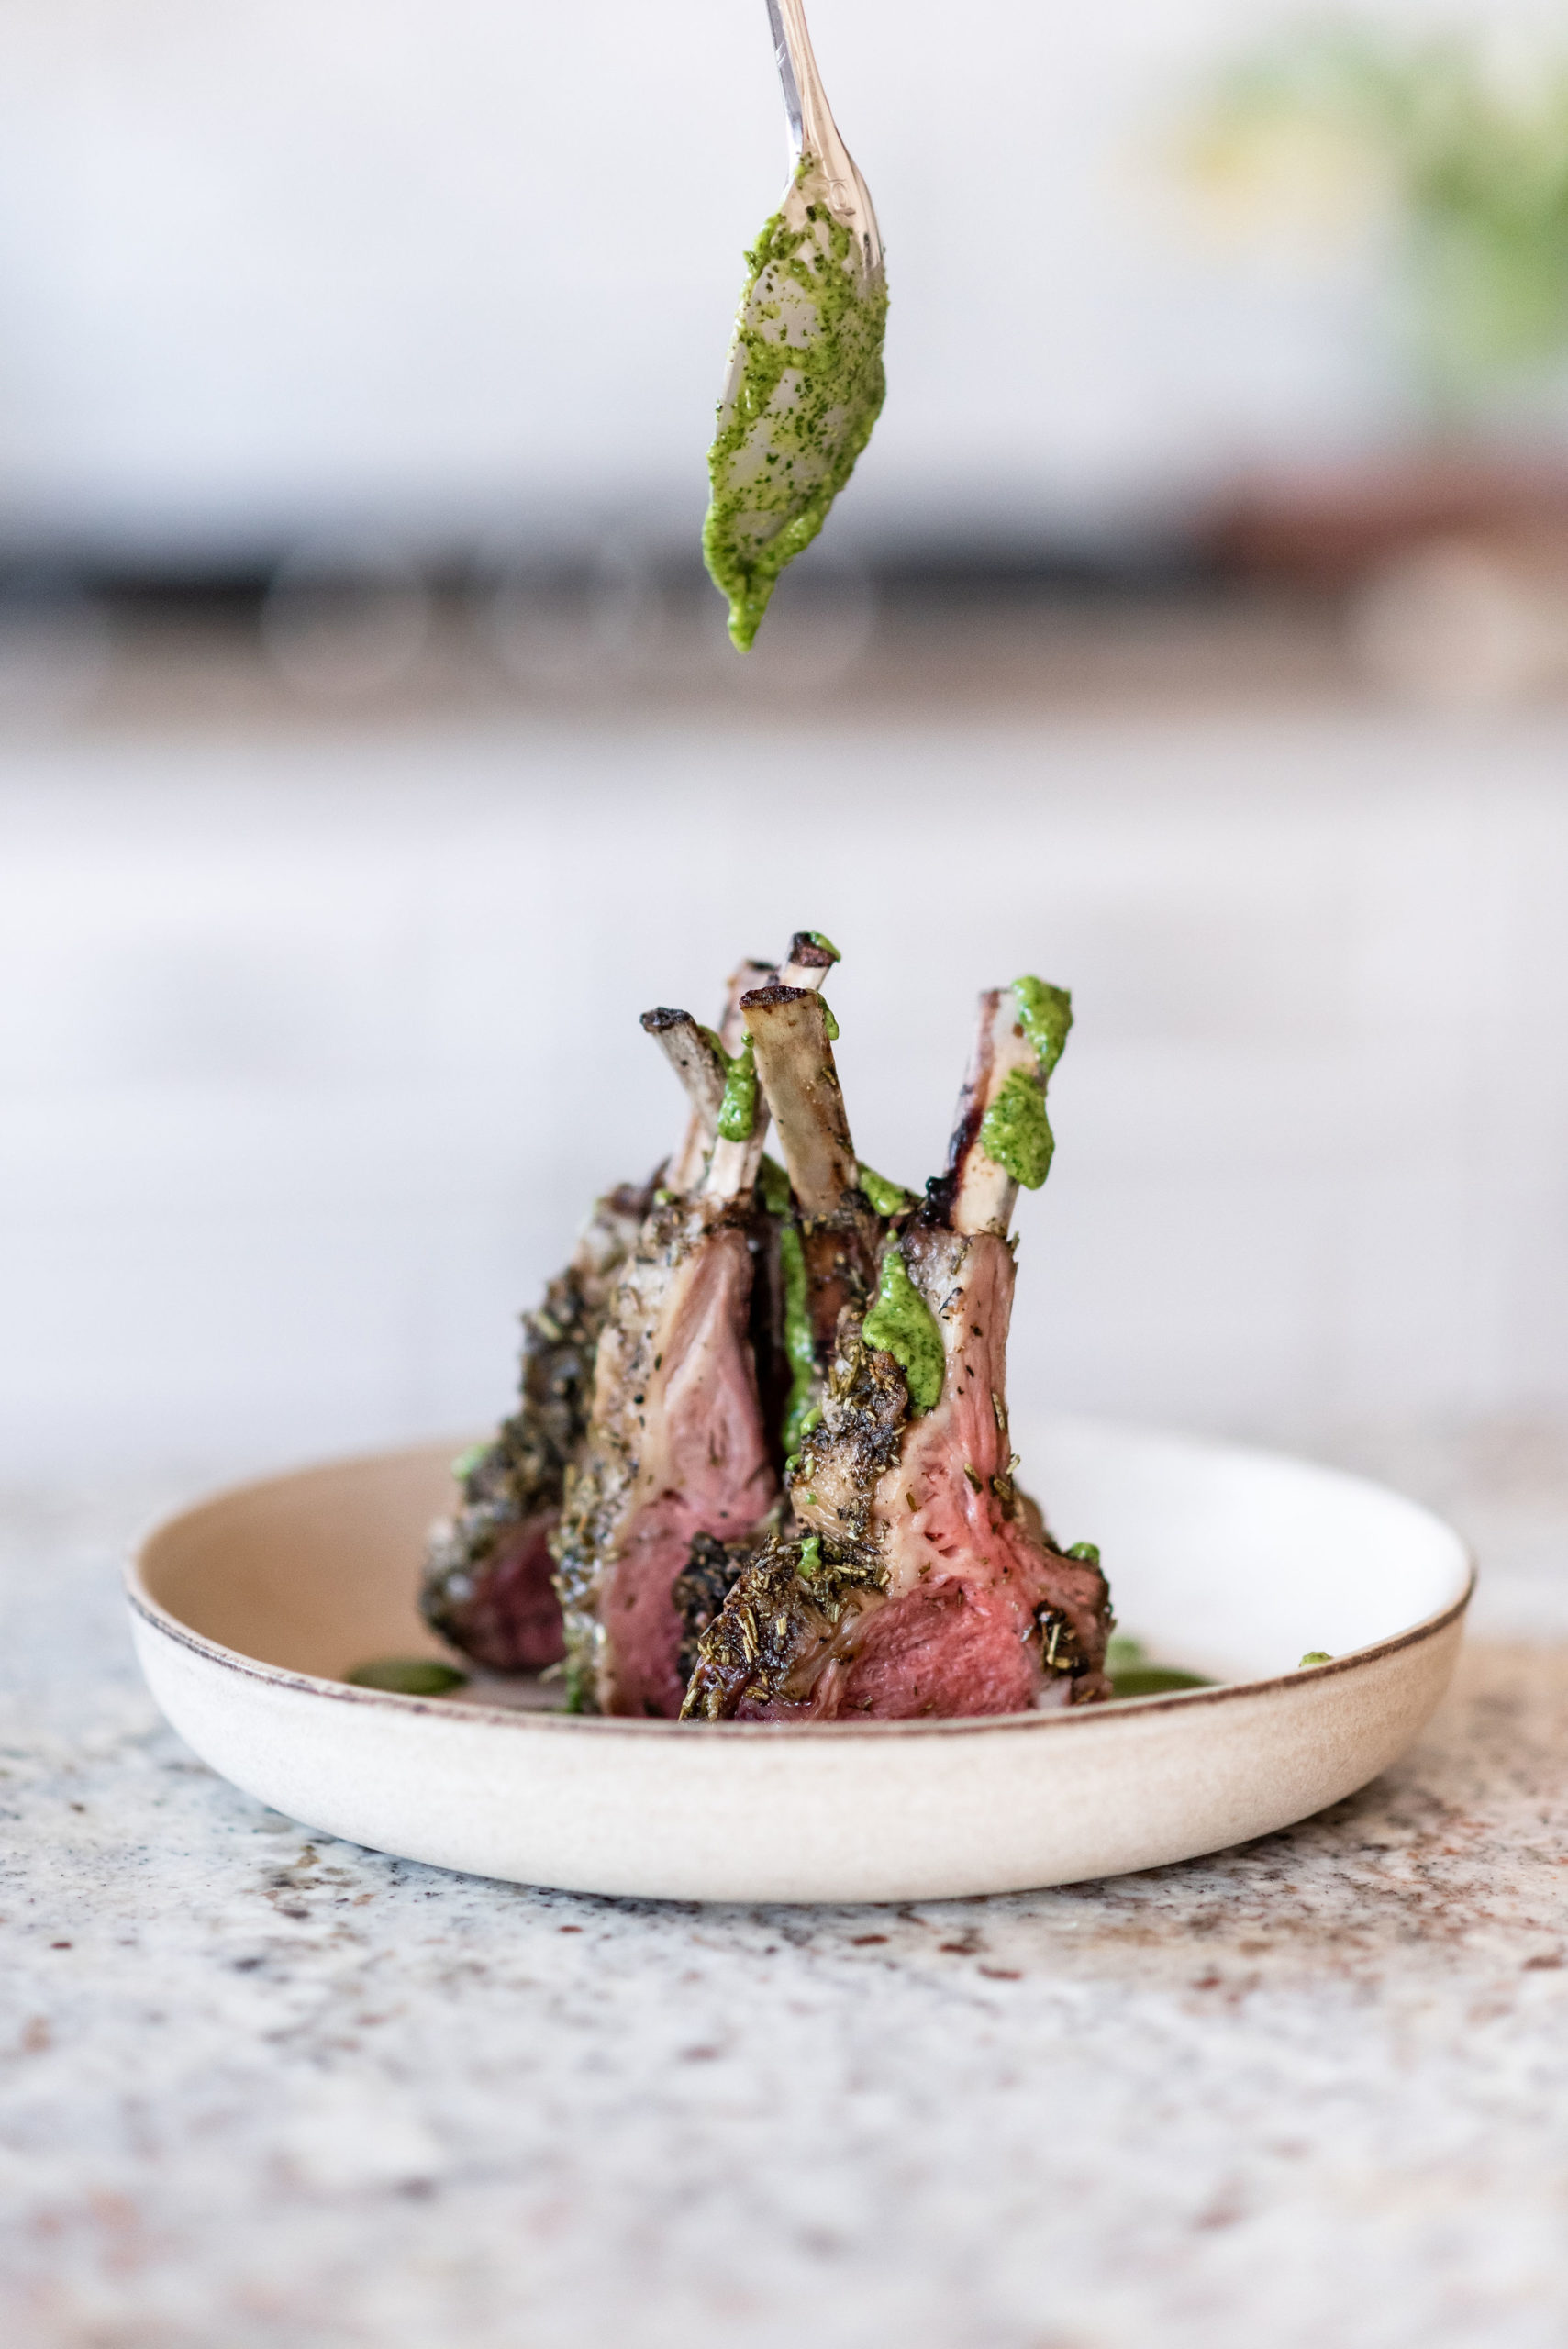
  • Step 5: Cooking your Lamb Rack. Lay down your rack, fat side down. Let it sear for about 5 minutes. You want to try to leave it alone and not move it, only checking once or twice to make sure you do not burn the fat. You are looking for a bit of caramelization and char on the fat. You will have a bit more char when searing on the grill and that is ok. The char is what makes the lamb so delicious in my opinion. After you are done searing, flip the rack and either put in the oven or lower the heat on your grill to 375 degrees until the cooking is complete.
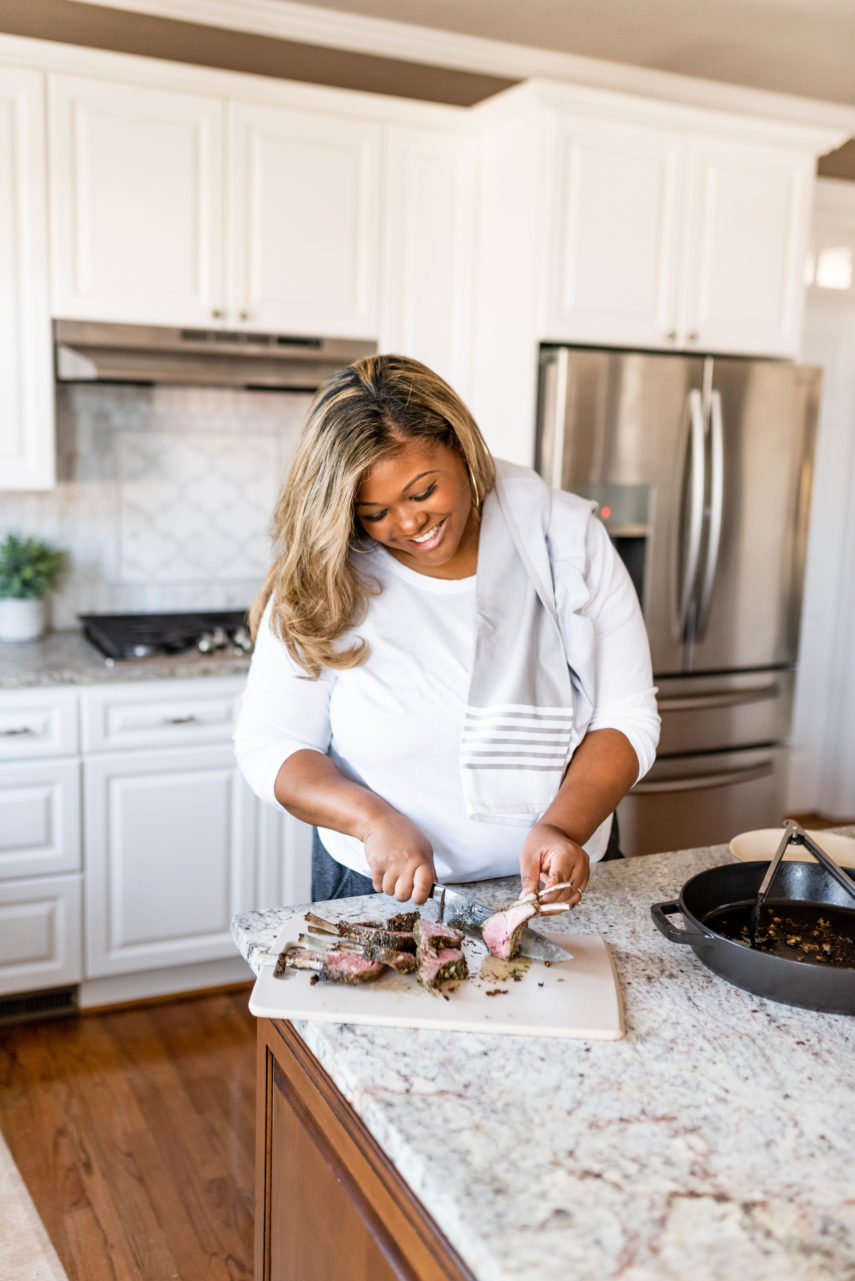
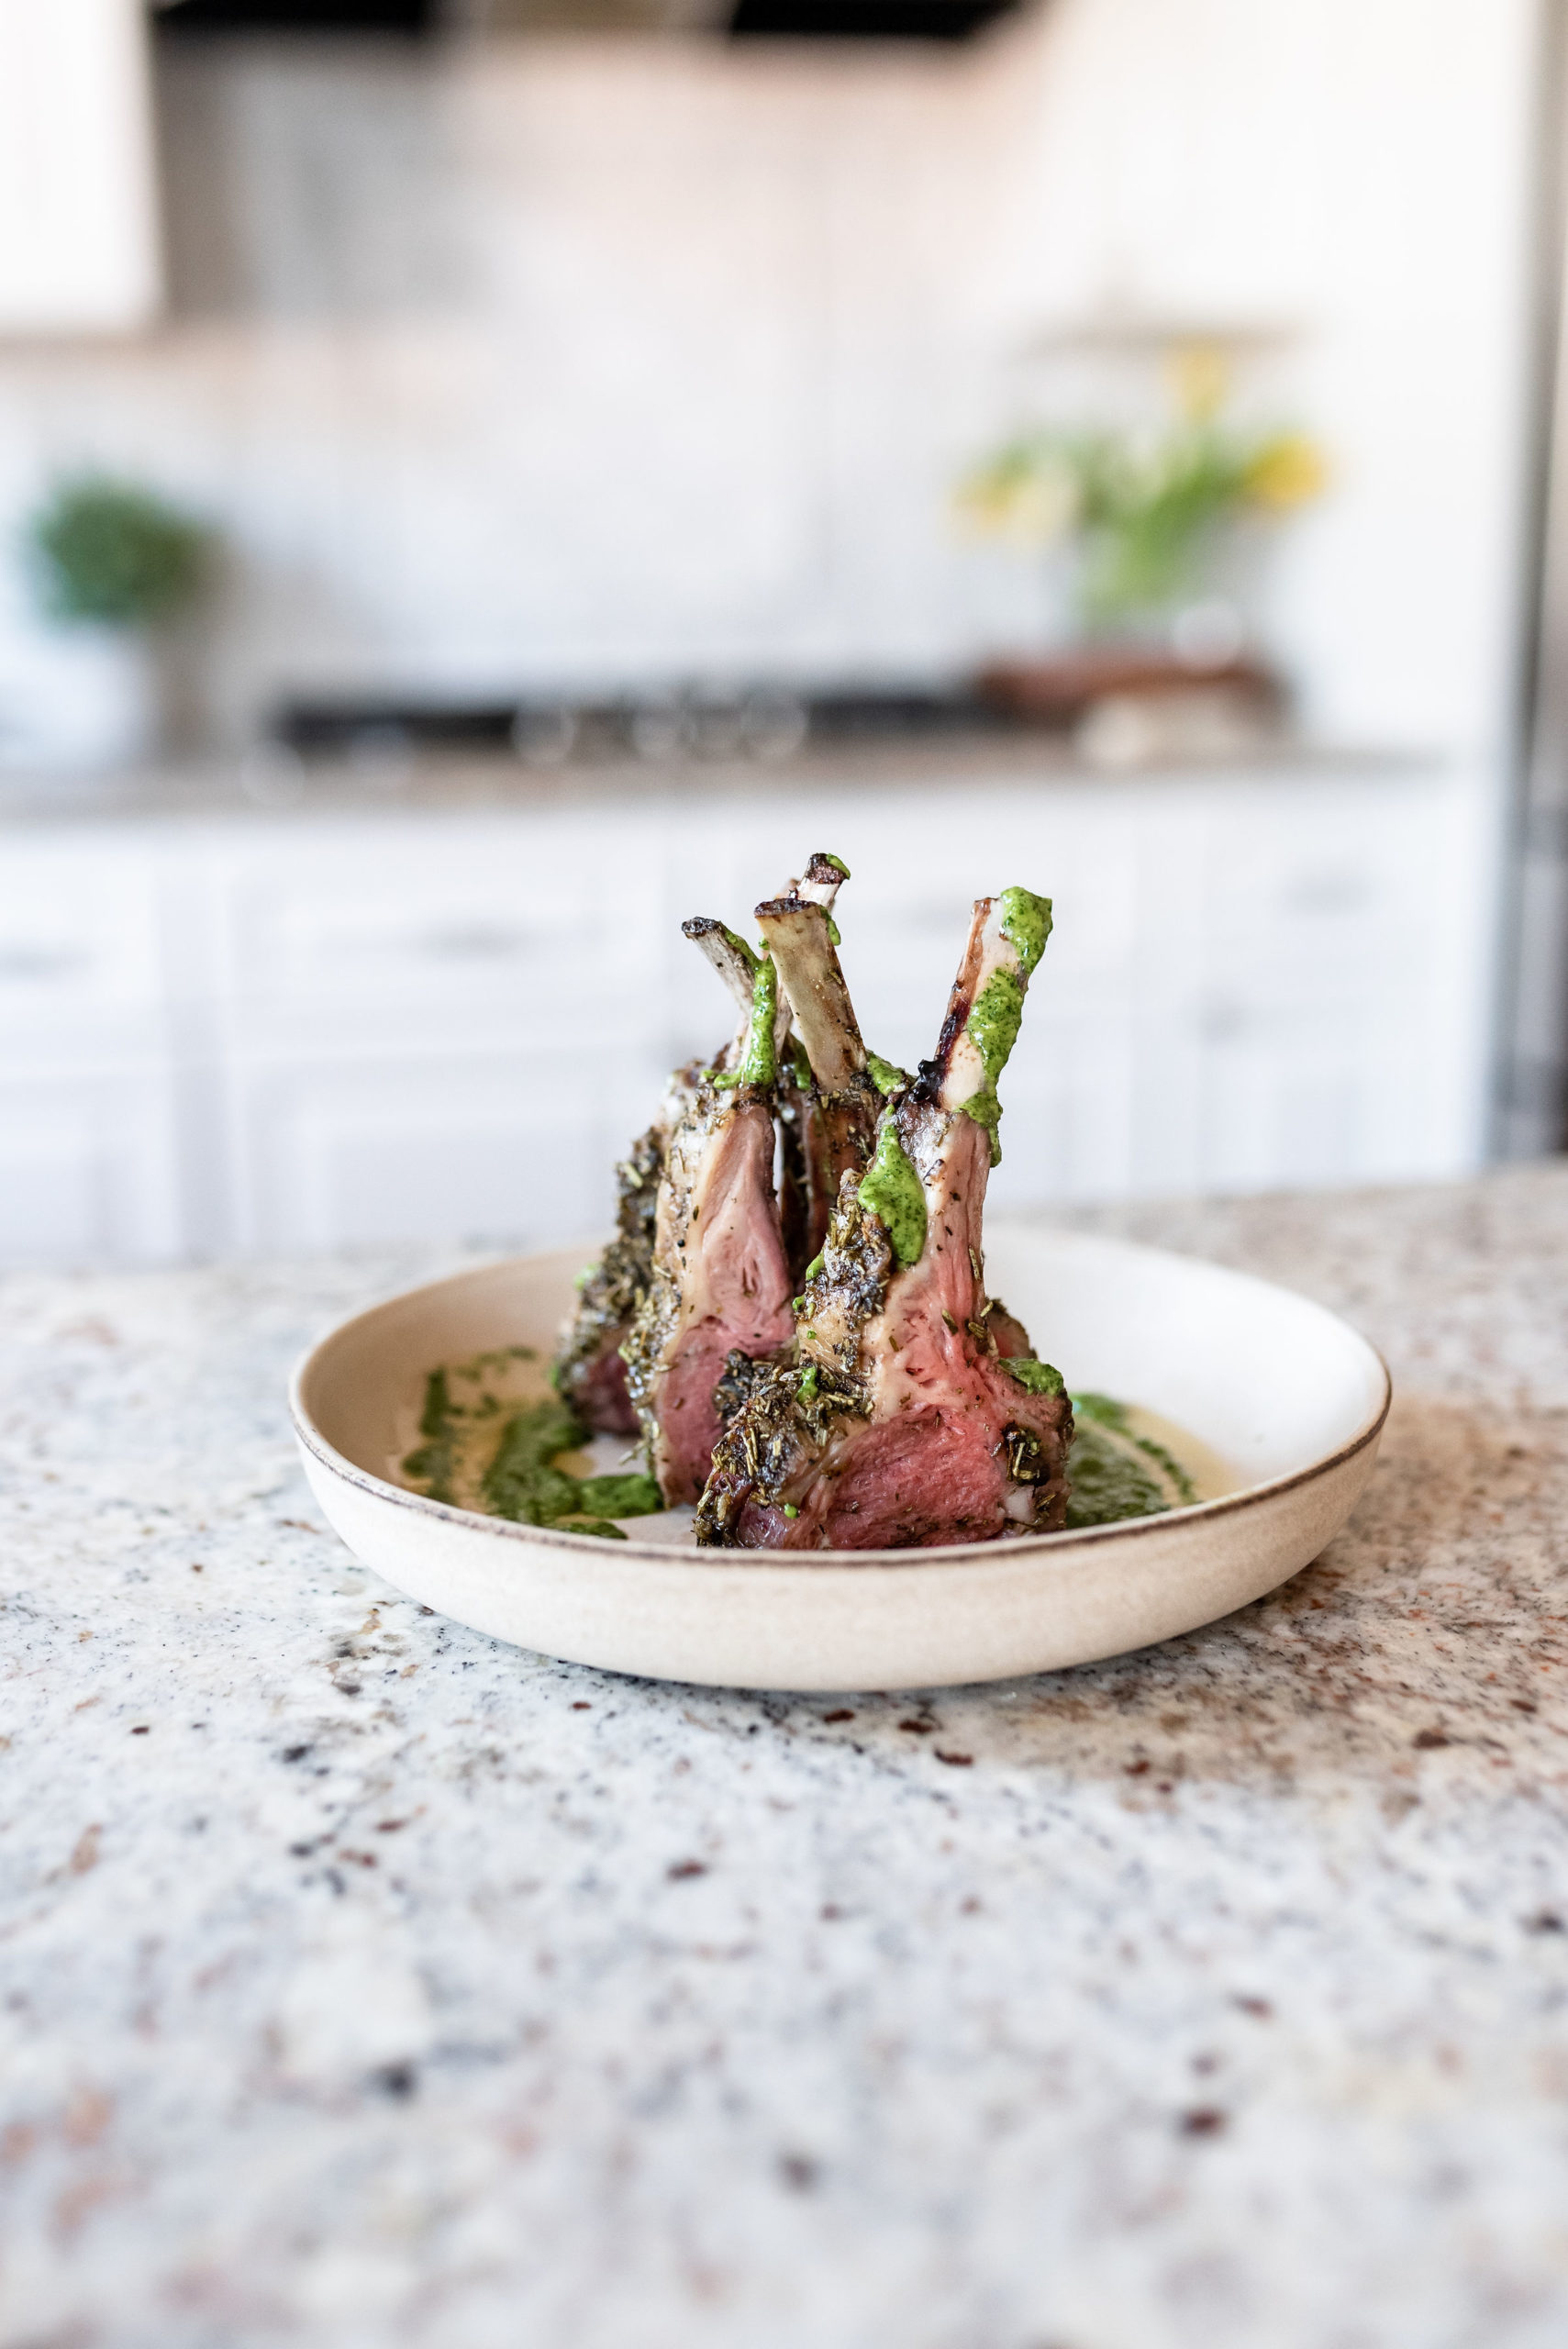
  • Step 6: Allow your rack of lamb to rest for about 10 minutes. If you cut into it too soon then you may lose excess juice and dry out your meat. When slicing each rib, make sure you use a sharp chef or carving knife. You can enjoy your lamb with the easy mint and garlic sauce that I have listed below, or you can use mint jelly.

Cooking Temperature for Lamb

When it comes to lamb, I have often heard that the more rare, the better. That is honestly a matter of opinion. I personally like my lamb well done, but my husband Harvey enjoys his medium rare. Here are the cooking temperatures to help you NOT overcook your precious meat:

  • Rare 135 degrees F
  • Medium Rare 140-150 degrees F
  • Medium 160 degrees F
  • Well Done 165+ degrees F

Have you tried this recipe?

If you have tried this recipe, please take a moment to rate it 5 stars below. Also, please leave a comment to let me know your thoughts on this recipe. You can also stay in touch with me on Instagram (that’s where I hang out the most). Tag me @RosalynnDaniels or #RosalynnDaniels if you post a photo of your dish, and I will share with my audience through Instastories.

Print
How to cook a rack of lamb in the oven or the grill

How to cook a rack of lamb in the oven or the grill


  • Author: Rosalynn Daniels
Print Recipe
Pin Recipe
Scale

Ingredients

1 Rack of Lamb with 8 to 9 ribs

1tbs Rosemary (You can use dried rosemary that has been grinded or fresh rosemary that has been finely chopped.)

1/4 Extra Virgin Olive Oil

3 Cloves of Garlic minced

2tsp Coarse Salt (or salt to taste)

1tsp Coarse Black Pepper (or pepper to taste)


Instructions

Pre-heat oven to 375 degrees.

In a large cast iron skillet, heat oil of choice over medium-high heat.

When your skillet is nice and hot, place your rack of lamb on the skillet, fat side down.

Sear your lamb for about 5 minutes or until your begin to see your desired crust and caramelization forming on the fat, then flip your rack.

Place your skillet in the oven and roast until your lamb reaches at least 160 degrees for medium.

Let your rack of lamb sit for about 10 minutes before cutting so that as much juice as possible stays in the lamb.

Slice and garnish with mint and garlic sauce.


Did you make this recipe?

Tag @RosalynnDaniels on Instagram and hashtag it #RosalynnDaniels

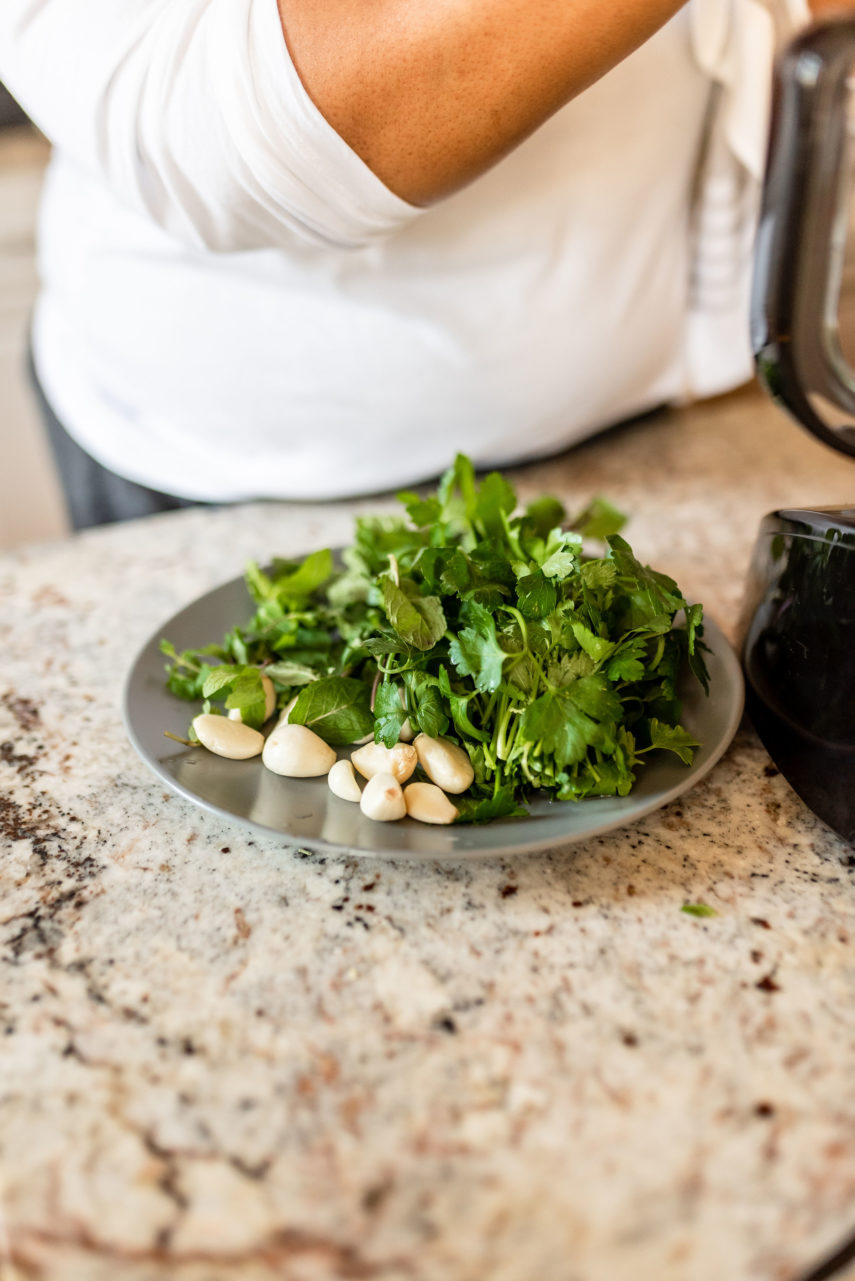
How to make Mint and Garlic Sauce for lamb

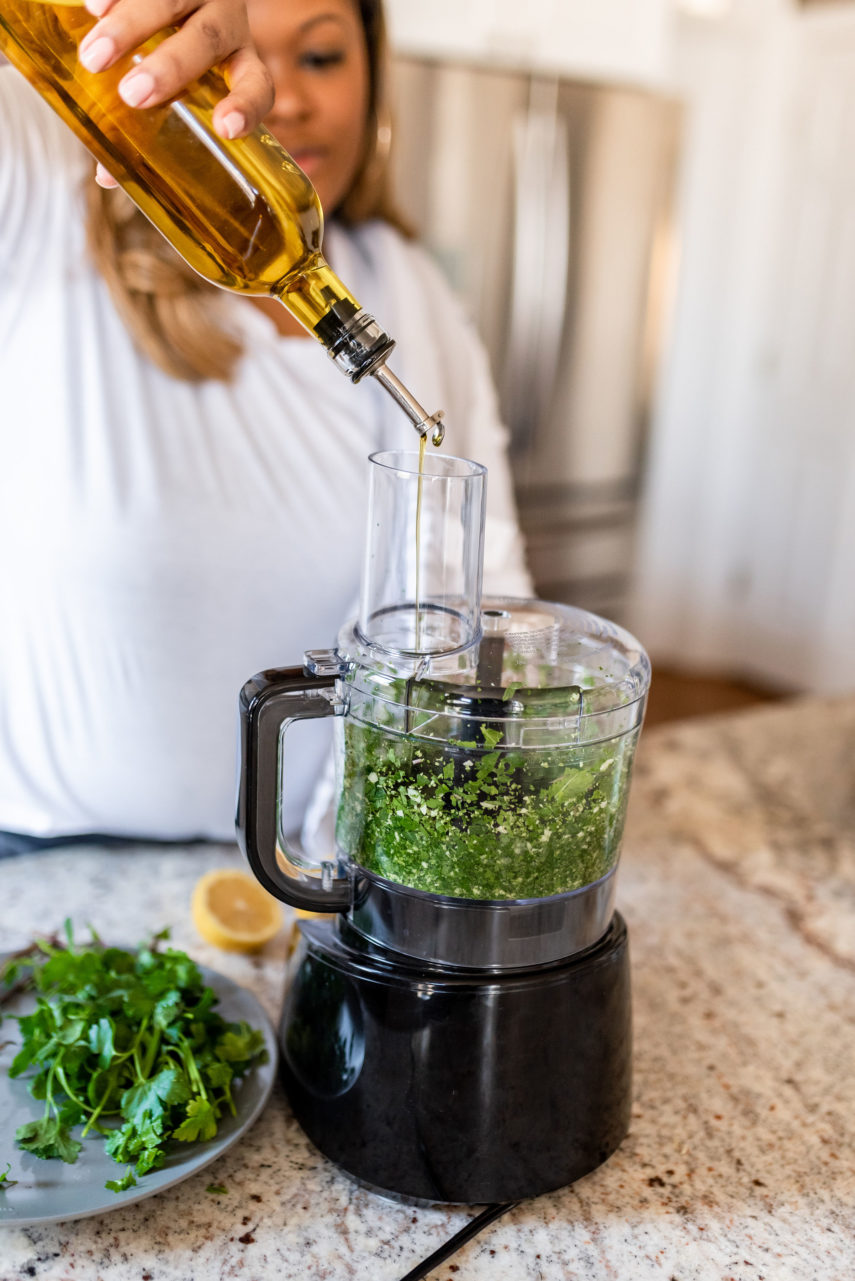
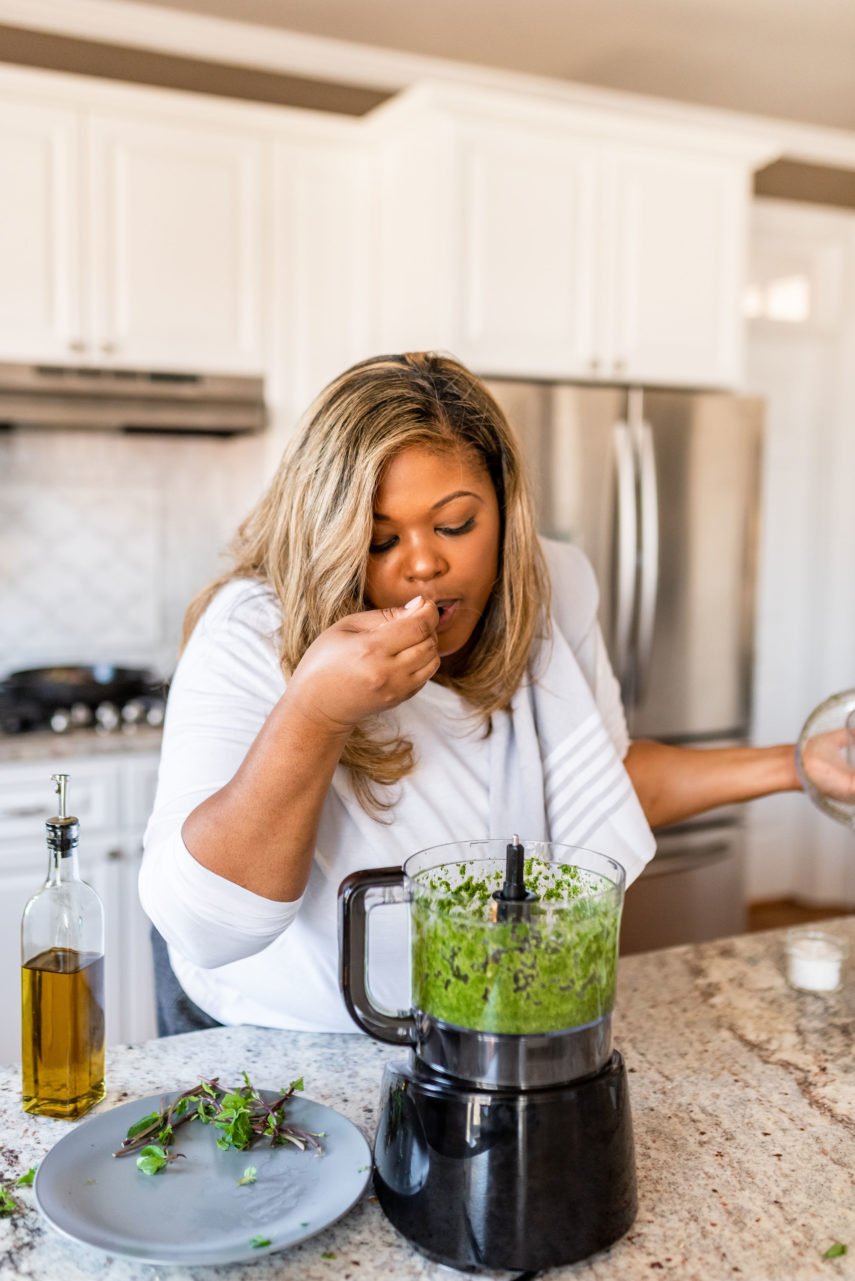
When eating my lamb, I love to either eat it with my easy Mint and Garlic Sauce or with a simple Mint Jelly. My Mint and Garlic sauce is so easy to make, and it honestly taste delicious with so many other dishes. You just want to blend fresh mint, parsley, garlic, lemon juice, olive oil, and salt in a food processor. Add your salt in one teaspoon increments to make sure you don’t add too much. Taste after you are done blending and it has reached a sauce-like consistency. If it’s too thick, just add a bit more olive oil. Feel free to add or reduce any of the ingredients so that it can fit your preferred flavor profile.

Print

Mint and Garlic Sauce for Lamb


  • Author: Rosalynn Daniels
Print Recipe
Pin Recipe
Scale

Ingredients

1 handful of Fresh Mint

1 handful of Fresh Parsley

1 Lemon (juiced)

4 Garlic Cloves

1/2c Extra Virgin Olive Oil

Salt to taste


Instructions

In a food processor, blend all ingredients until finely chopped and forms a sauce.

If it is too thick, add more olive oil.

Add salt to the processor in 1 tsp increment until you reach your desired level of salt.


Did you make this recipe?

Tag @RosalynnDaniels on Instagram and hashtag it #RosalynnDaniels

If you enjoy this recipe, then you may also enjoy my Beef Shank Osso Bucco. It’s another recipe that I love to make in my other favorite cookware, the Staub Dutch Oven. It’s perfect for the holidays and always leaves a wow-factor.

Leave a Comment

SHARE
« Irish Apple Cake with Walnuts
How to make Easy Asparagus Puff Pastry Pocket Squares »

YOU MIGHT ALSO LIKE

  • How to make easy Matcha Chia Pudding for breakfast on the go
  • italian inspired family dinner michelle gainey rosalynn daniels lemiga pottery barnItalian Inspired Tablescape with Michelle Gainey
  • How to make DIY Putty
  • Tater Tot Breakfast CasseroleTater Tot Breakfast Casserole

Leave a Reply Cancel reply

Your email address will not be published. Required fields are marked *

Recipe Rating


Rosalynndaniels.com

Rosalynn Daniels

Thank you for taking the time to check out my site. Take a look around and make yourself at home!
@RosalynnDaniels

LET’S GET SOCIAL

  • Facebook
  • Instagram
  • Pinterest
  • Twitter
  • YouTube

LOOKING FOR SOMETHING?

JOIN THE LIST

ARCHIVES

CATEGORIES

  • appetizers
  • Baking
  • Beef
  • Birthdays
  • Breakfast
  • Christmas
  • Cocktails
  • Desserts
  • DIY & Hacks
  • Drinks
  • easter
  • Easy Meals
  • Entertainment
  • Food + Recipes
  • Halloween
  • Holiday
  • Instant Pot Recipe
  • lamb
  • one pot
  • One Skillet
  • Plant Based
  • Pressure Cooker Meal
  • Printouts
  • Roundup
  • Side Dish
  • Snacks
  • Sponsored
  • sweets and treats
  • Thanksgiving
  • Travel & Lifestyle
  • Uncategorized
  • Vegan
  • Vegetarian
  • Video

POPULAR POSTS

BBQ Lentils over Cheese Grits

Apple Walnut Vegan Bread Pudding with Maple Bourbon Glaze

Apple Walnut Vegan Bread Pudding with Maple Bourbon Glaze

vegetable au gratin with cheese sauce in cast iron skillet

Vegetable Au Gratin

Amen Amen! We made it past Spring Break and back i Amen Amen! We made it past Spring Break and back into the Monday grind! I hope everyone is well rested and refreshed after having a little “break”. Shoutout to those who were sipping Mango Mojitos with me all week long🥂😘

To get back into the swing of things, I’m kicking off the week with a Watermelon Salad with Berries and Citrus Marinated Beets. It’s Spring, the weather is warm, and watermelons are finally back in the grocery stores (so don’t put yourself in a box and think watermelon is only for Summer) Go grab you some and make this easy salad ASAP. 

As you can see it was super simple to make the marinade for the beets. Then you just toss them with the remaining ingredients. Either serve with a garnish of basil, or even add a dollop of creme fraiche to individual servings. Find this printable recipe at the link in my bio, and definitely save for your upcoming Mother’s Day spread. Have a great week everyone!
Update: I’m still in Spring Break mode. The Bigs Update: I’m still in Spring Break mode. The Bigs (Harper & Ivey) went to spend the rest of the week with their Grandparents. So, Harvey, Hollis, and I have been living life super easy this week. Luckily I had some or my Pulled Pork in the deep freezer (I’m trying not to cook this week either), so we used that for tacos last night and pizza on Monday. Grab this simple recipe at the link in my bio. I’ll be back soon to update you on the other things we’ve been up to. Until then, I hope you enjoy your day💖
Nope, I’m not gonna do it. This past weekend was Nope, I’m not gonna do it. This past weekend was too beautiful not to continue. AND the kids are on Spring Break.....pah-lease! I’m going to stay right in this bed until someone else in the house wakes up, and I’m going to relax all day and enjoy leftovers from Easter. So I’ll start over maybe tomorrow or Wednesday. Have a great week everyone, I know I am💖
Ok guys, I’m ending the week with my Cheesy Aspa Ok guys, I’m ending the week with my Cheesy Asparagus au Gratin! A lot of you saw it on my stories a couple weeks ago and wanted the recipe, so I’m happy to announce that I’ve now published it on RosalynnDaniels.com! This dish is BOMB as you can see, and you don’t need a ton of ingredients. At this point I just make me and Harvey our own batches because we never want to share😩🤣 But you should totally SHARE this recipe with your Momma, Sister, Brother, Lil boo, or best friend! The link is in my bio.
If lamb isn’t your vibe, then you should totally If lamb isn’t your vibe, then you should totally try my Beef Shank Osso Bucco recipe! It’s the perfect wholesome meal that will have your family feeling cozy and full of love by the time they finish their meal. Find this simple recipe at the link in my bio.
Just in time for Easter, I am excited to show you Just in time for Easter, I am excited to show you step by step instructions on how you can easily cook your Rack of Lamb, either in the oven or on the grill. #ad The best part is that I show you how to cook either way using my two handle Paella Fry Pan by @Staub_usa. Yes it’s a paella pan, but I can honestly say that this cast iron fry pan is so much more. I find myself using it daily for most of my family meals because it’s huge and can fit enough food for my family of five, it provides even heat distribution, and the two handles are like a dream come true. If you make any of my recipes, then you know that a lot of times I start on the stove and end in the oven. So, the two handles give me more security when carrying the pan full of hot food to the oven. A lot of you have asked what pans I recommend, and I always say @Staub_usa because they truly provide a quality product that you can pass down from generation to generation. Learn more when checking out this recipe. 

Speaking of, you can find this simple recipe for Rack of Lamb and my Mint and Garlic Sauce at the link in my bio. I walk you through tips on how to purchase the right rack of lamb, to a simple marinade, and how to cook it from beginning to end in one skillet. If you have any questions, feel free to dm me, and don’t forget to share this recipe with someone who you think is awesome. #madeinstaub #zwilling1731
Easy Apricot Hot Cross Buns for Beginners! Yes, yo Easy Apricot Hot Cross Buns for Beginners! Yes, you read that correctly. To all of my baking challenged friends out there, I have tested an endless list of Hot Cross Bun recipes to come up with the perfect one that is approachable and easy to understand for those who always bake, and for those who stray away from it. (AD) I partnered with my friends at @BobsRedMill to show you how to use a quality ingredient, like their Organic Unbleached White- All Purpose Flour to make these sweet brioche-like buns. This flour includes malted barley to enhance the rise when using yeast, which comes in handy to make an extra fluffy bun. #bakedwithbobs

Find the recipe just in time for Easter, at the link in my bio. Save this post, so that you can refer to it later, and share this recipe with someone who you think is awesome.
#betterwithbobs #bobsredmill
Who’s in charge of desserts this Easter? I’m a Who’s in charge of desserts this Easter? I’m almost at place where I’m willing to let Harper be in charge. She’s been in the kitchen since around 2 1/2-3 years old. I would just start with super simple recipes, like the Mini Flower Tarts that I posted yesterday. Then I slowly increased the skill level to the recipes she would help with, and it seemed like she became comfortable in the kitchen in no time!

My Very Berry Trifle is a great recipe to get your kiddos in the kitchen to build their confidence in their cooking or baking abilities. This is also a great dessert to enjoy this Passover and Easter. Have your kiddos assist in making it, or have them make it alone (with supervision of course).
Find this simple delicious recipe at the link in my bio, and share with friends. Hope you enjoy it as much as we have over the years💖
Whoa, I almost forgot to share Hollister’s a.k.a Whoa, I almost forgot to share Hollister’s a.k.a. Baby Billie Dee’s 4 month photo. Hollis is now 26in and 16lbs. He LOVES hanging out in his new jumper, he now rolls over any chance he can get (goodbye leaving him on the couch), and he still has a lot to say. Harvey and I were reminiscing on Ivey and Harper turning 4 months, and we actually found their milestone photos too. It’s crazy how they are all so different, yet all the same. And thank you Kelly @eattherainbow_kids for sharing a little Colorado love in this cute onesie that you got for Hollister! 💙💙💙

© 2018 ROSALYNN DANIELS